Brittaīs wolf

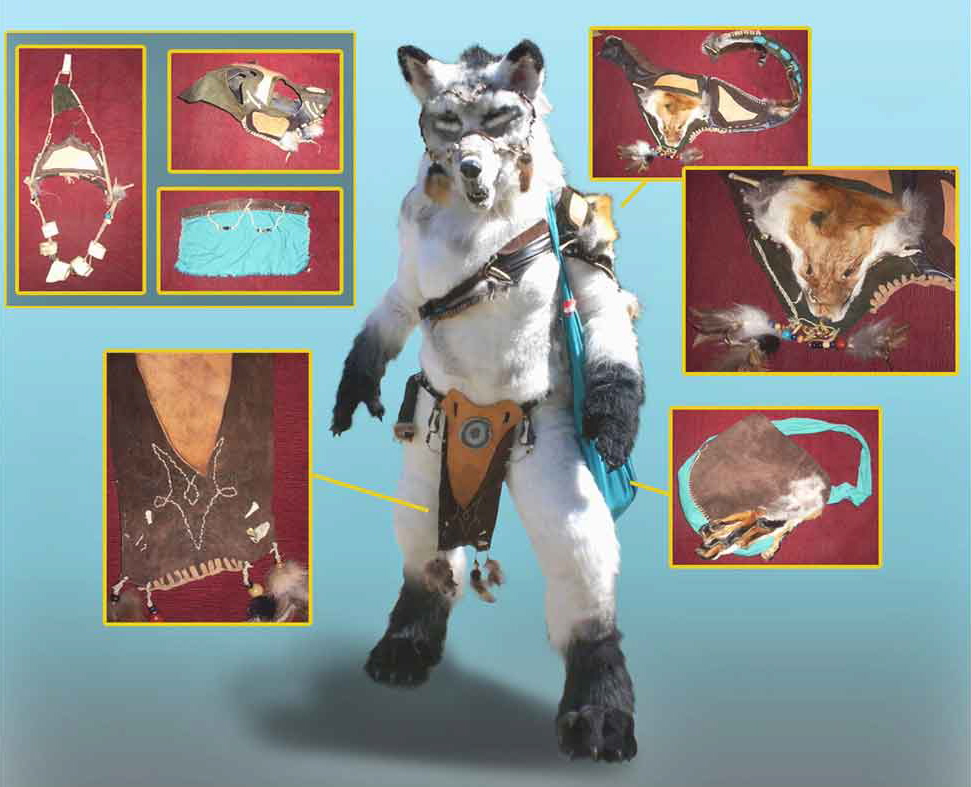
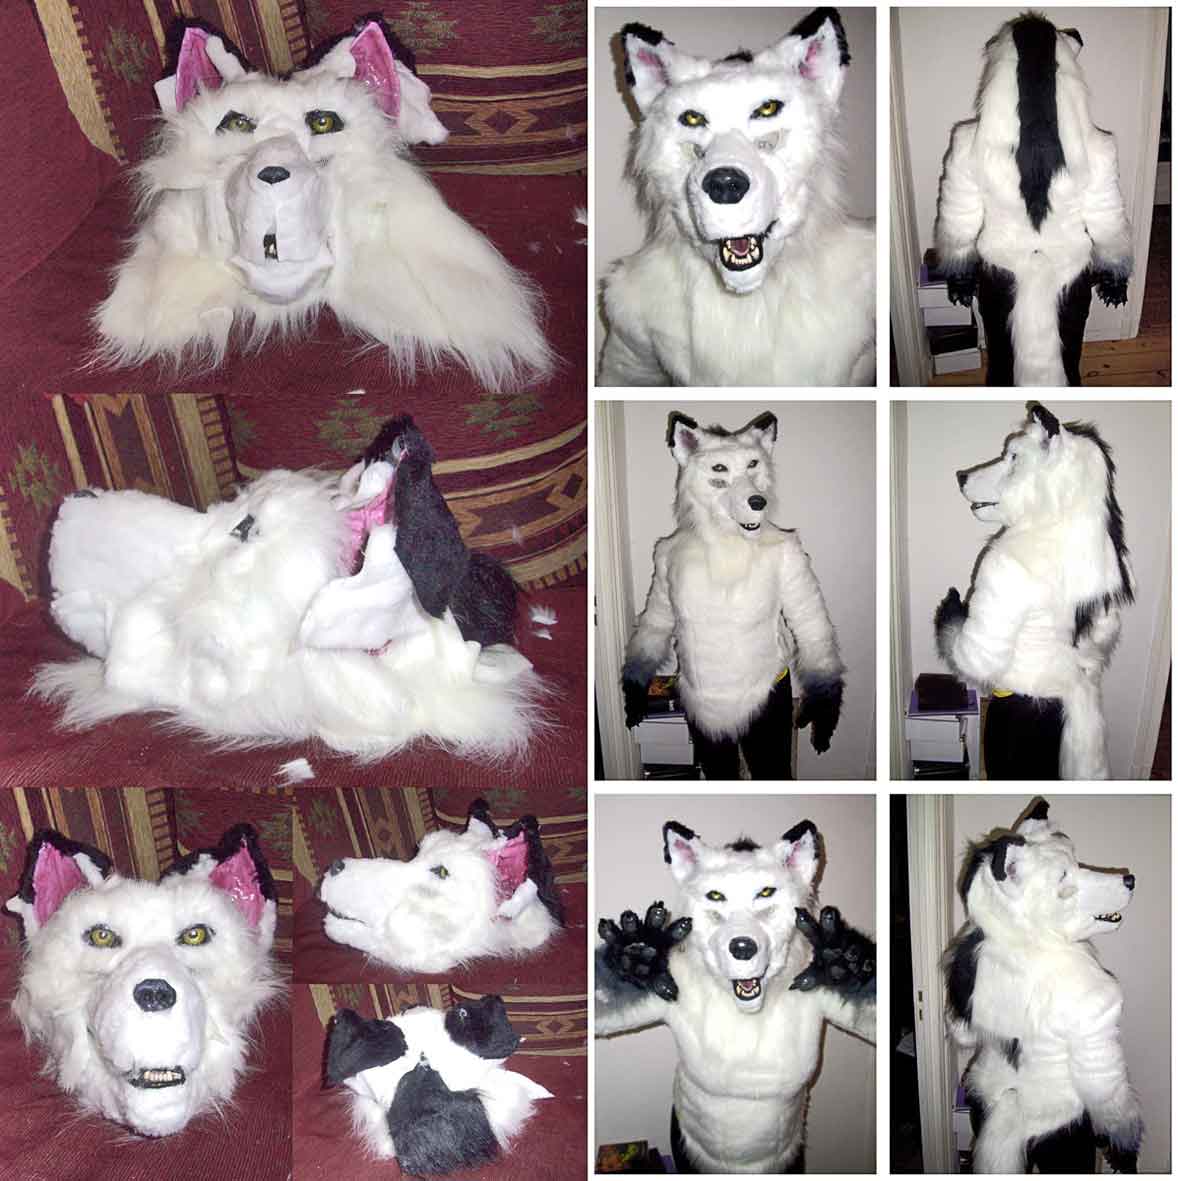
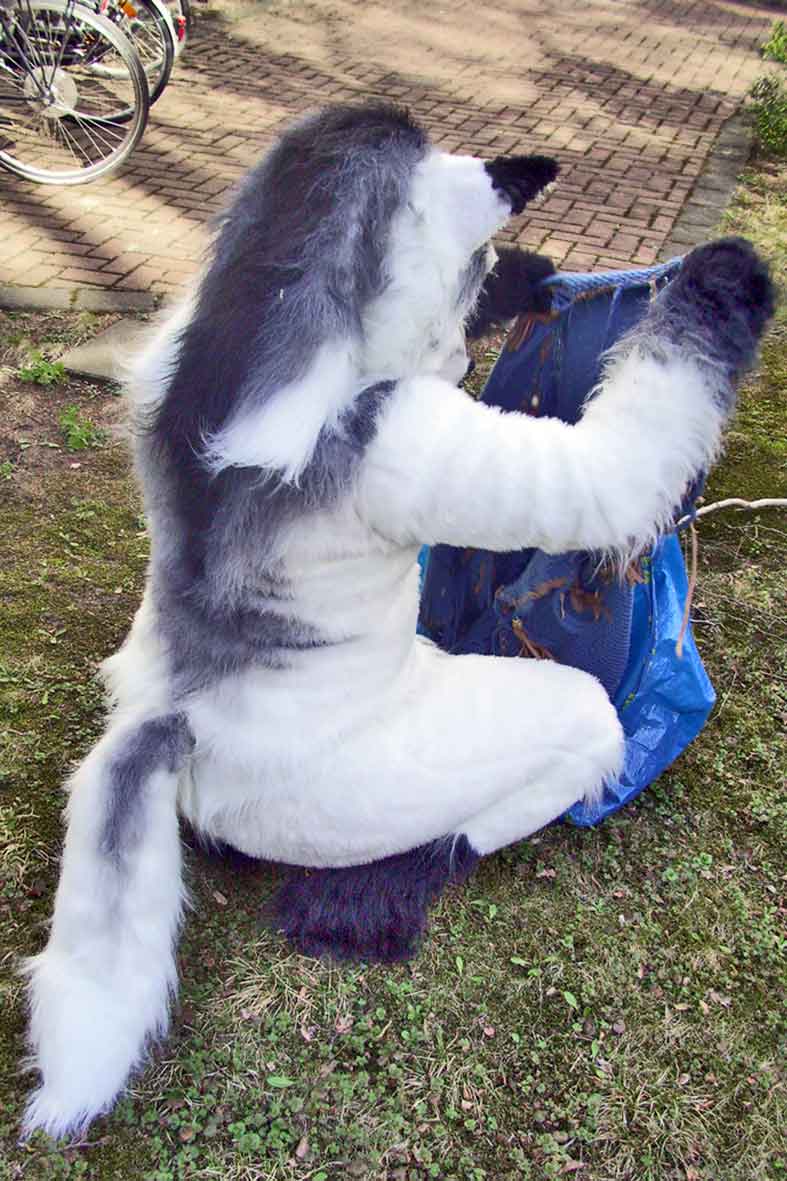
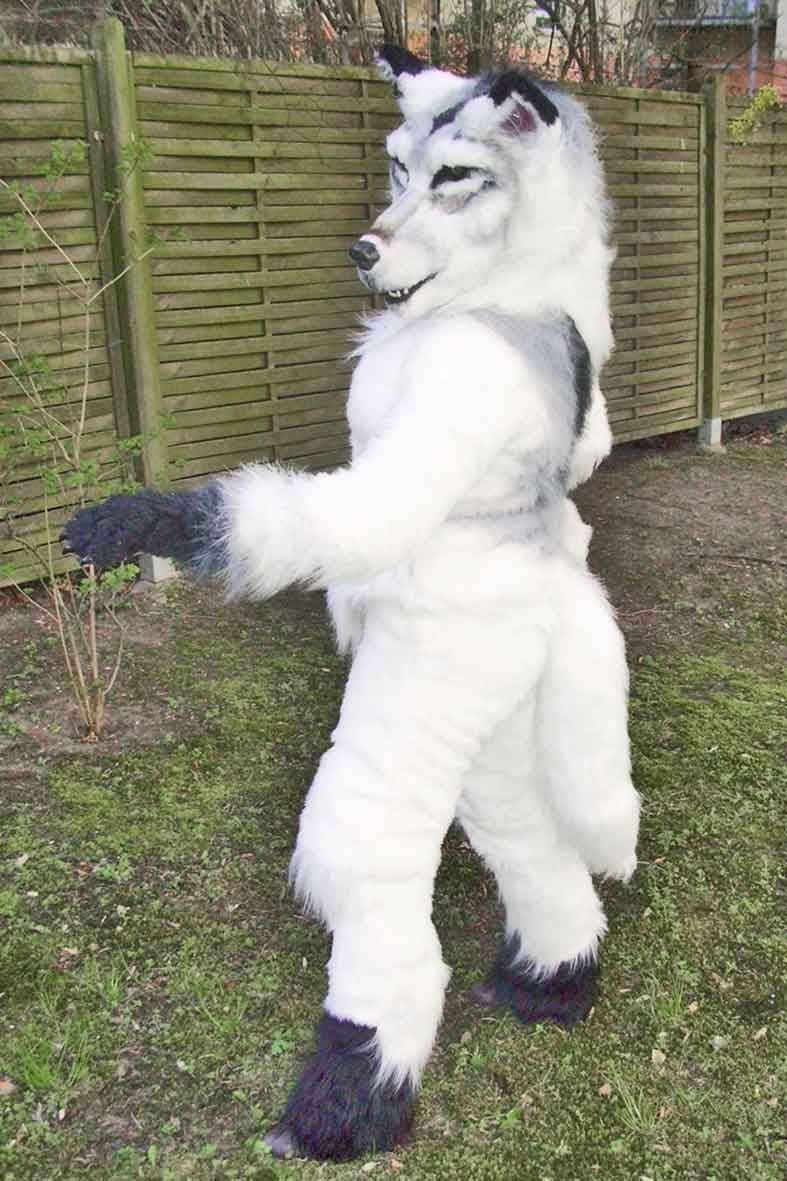
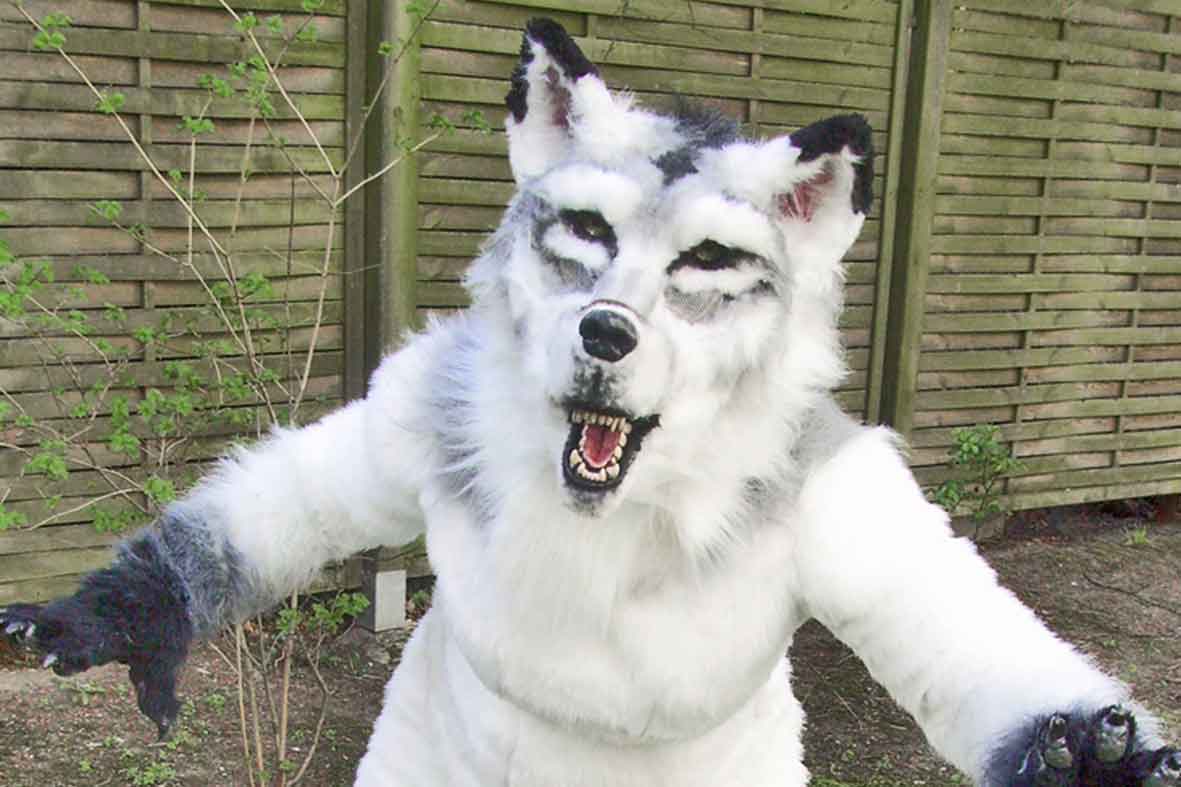
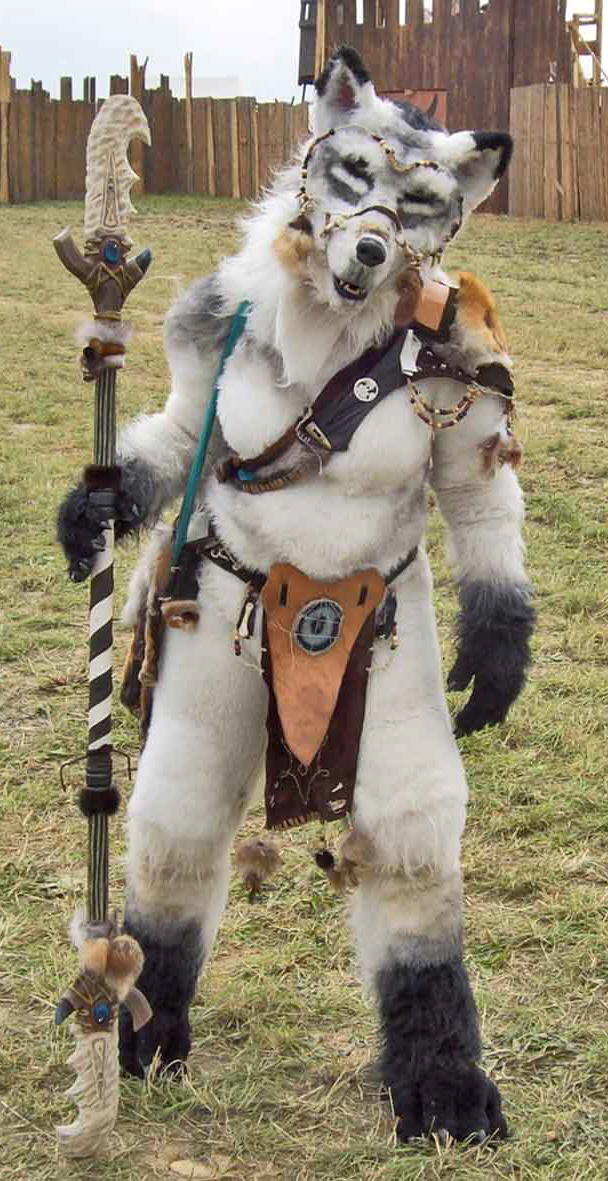
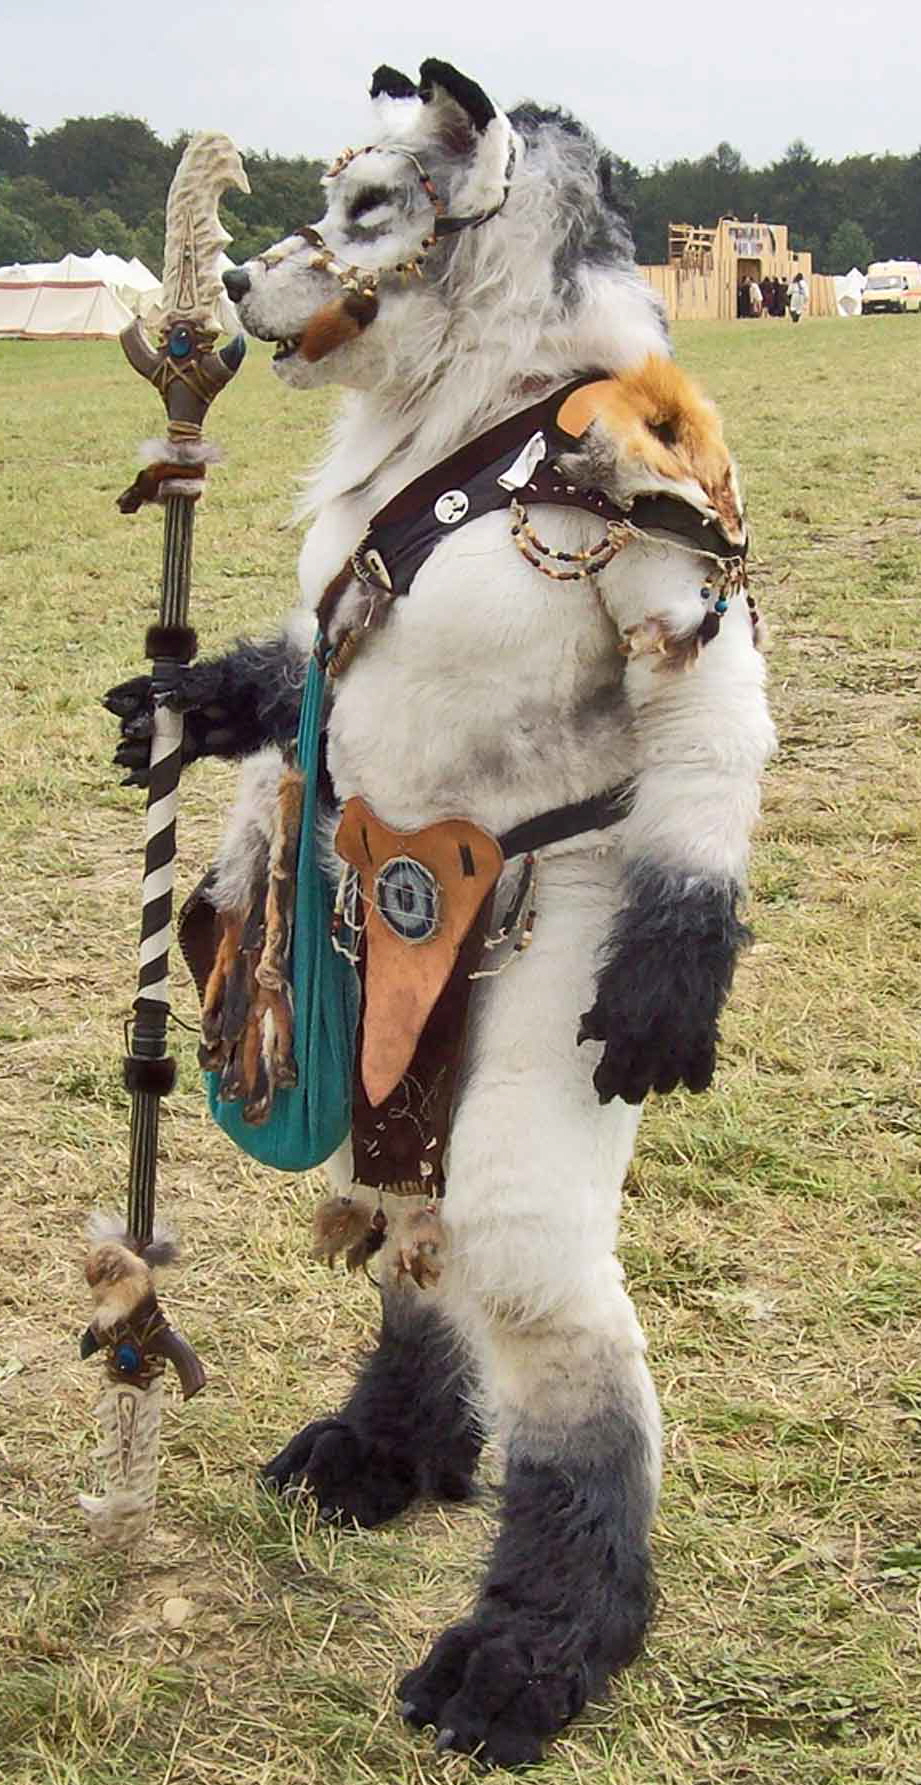
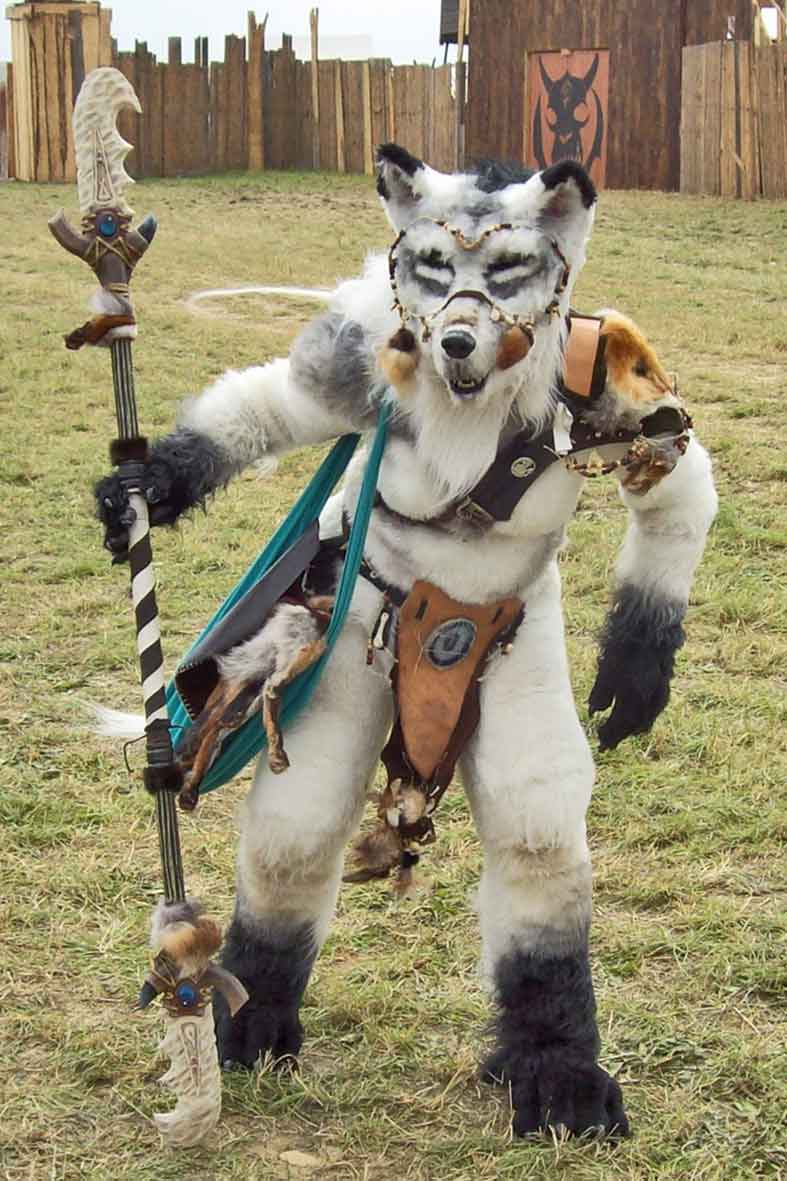
Britta (LarpeR-Ning and DeviantArt http://poisonmilow.deviantart.com/) has carried out an ambitious large-scale project: 2 wolf-suits, a grey and a brown one. Shown here is the documentation of the evolution of the grey-white she-wolf “Youa” till july 2011:

YMBrW01

The creature is no “werewolf” but a “beastman”; a non-human species. And because it is a “player- character” (contrary to NPSc; “non-player-characters”  working for the organisators of a game) Iīm using the term “finished” only in a cautious and timid way like in “fully operational”: As impressive the outfit may look at this stage- costumes like this tend to constantly evolve and are never really “finished”.

The documentation is structured in the themes “mask”, “body”, “hands” and “feet”. The mask on the picture by the way is already the second one, but the building of the original wolfīs head is so interesting that it would be wrong not to show the pictures.

Ok, from here on Brittaīs text (pictures can be enlarged via context-menu):

The mask

YMBrW02

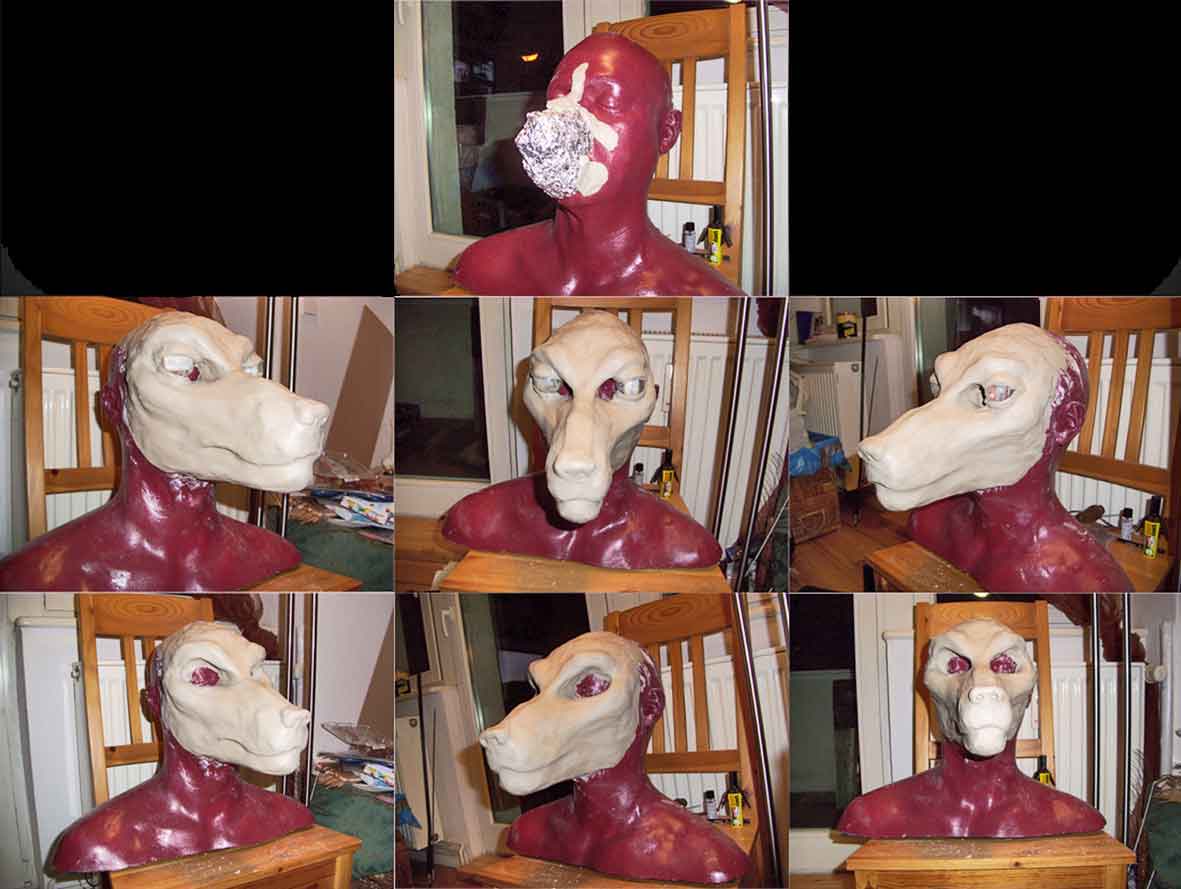
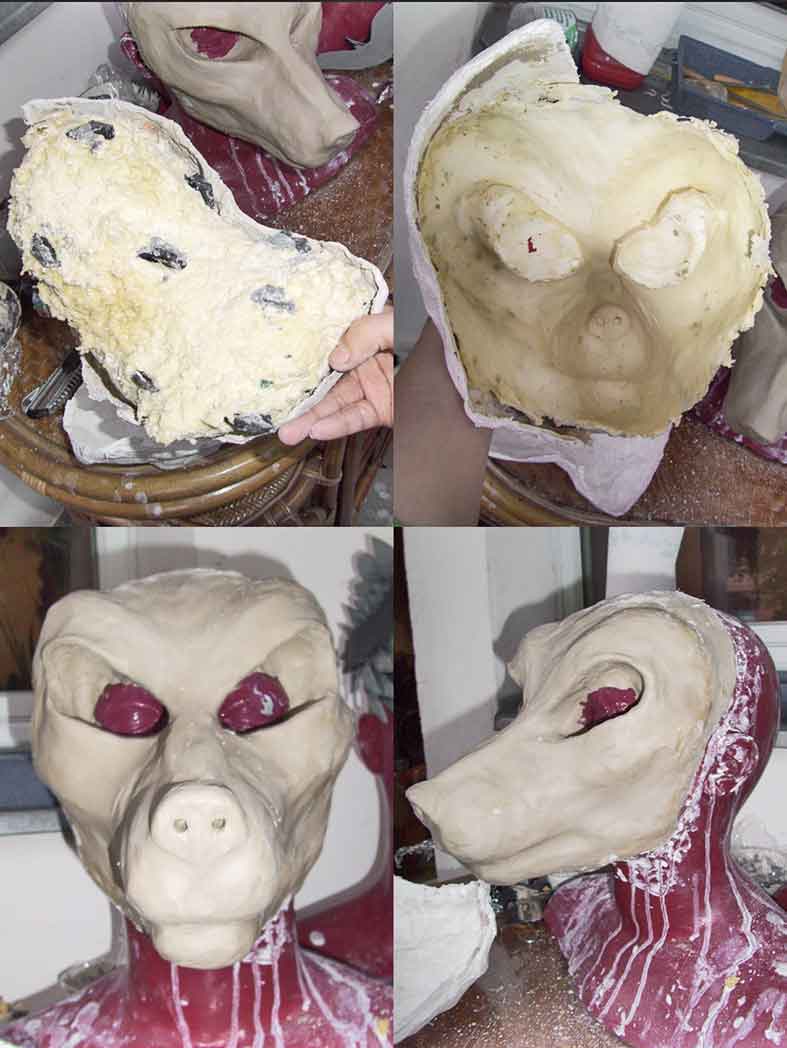
Above: Sculpted clay model of the mask. Inspired by some pictures on DeviantArt and after some talking with a friend I decided to attempt to build the mask by making a cast and using artificial resin.
Modelling with clay worked much better than expected and the idea of using crumpled-up aluminium foil as filler to save clay (and weight) proved a great piece of advice.
I deliberately elongated the snout and made it big, keeping in mind that the headīs final shape will be defined by the application of fur. The male wolf will also have recognizable masculine features.
The “eyes” you see in the pictures in the middle row are bouncy balls I used as substitution. I will later try making follow-me-eyes from resin.

“Follow-me-eyes” are built in a way that the pupil is set in a recessed point of the eyeball. Done the right way this creates the disturbing effect that the eyes seem to follow an observerīs movements: the mask “lives”.
Alex

YMBrW03

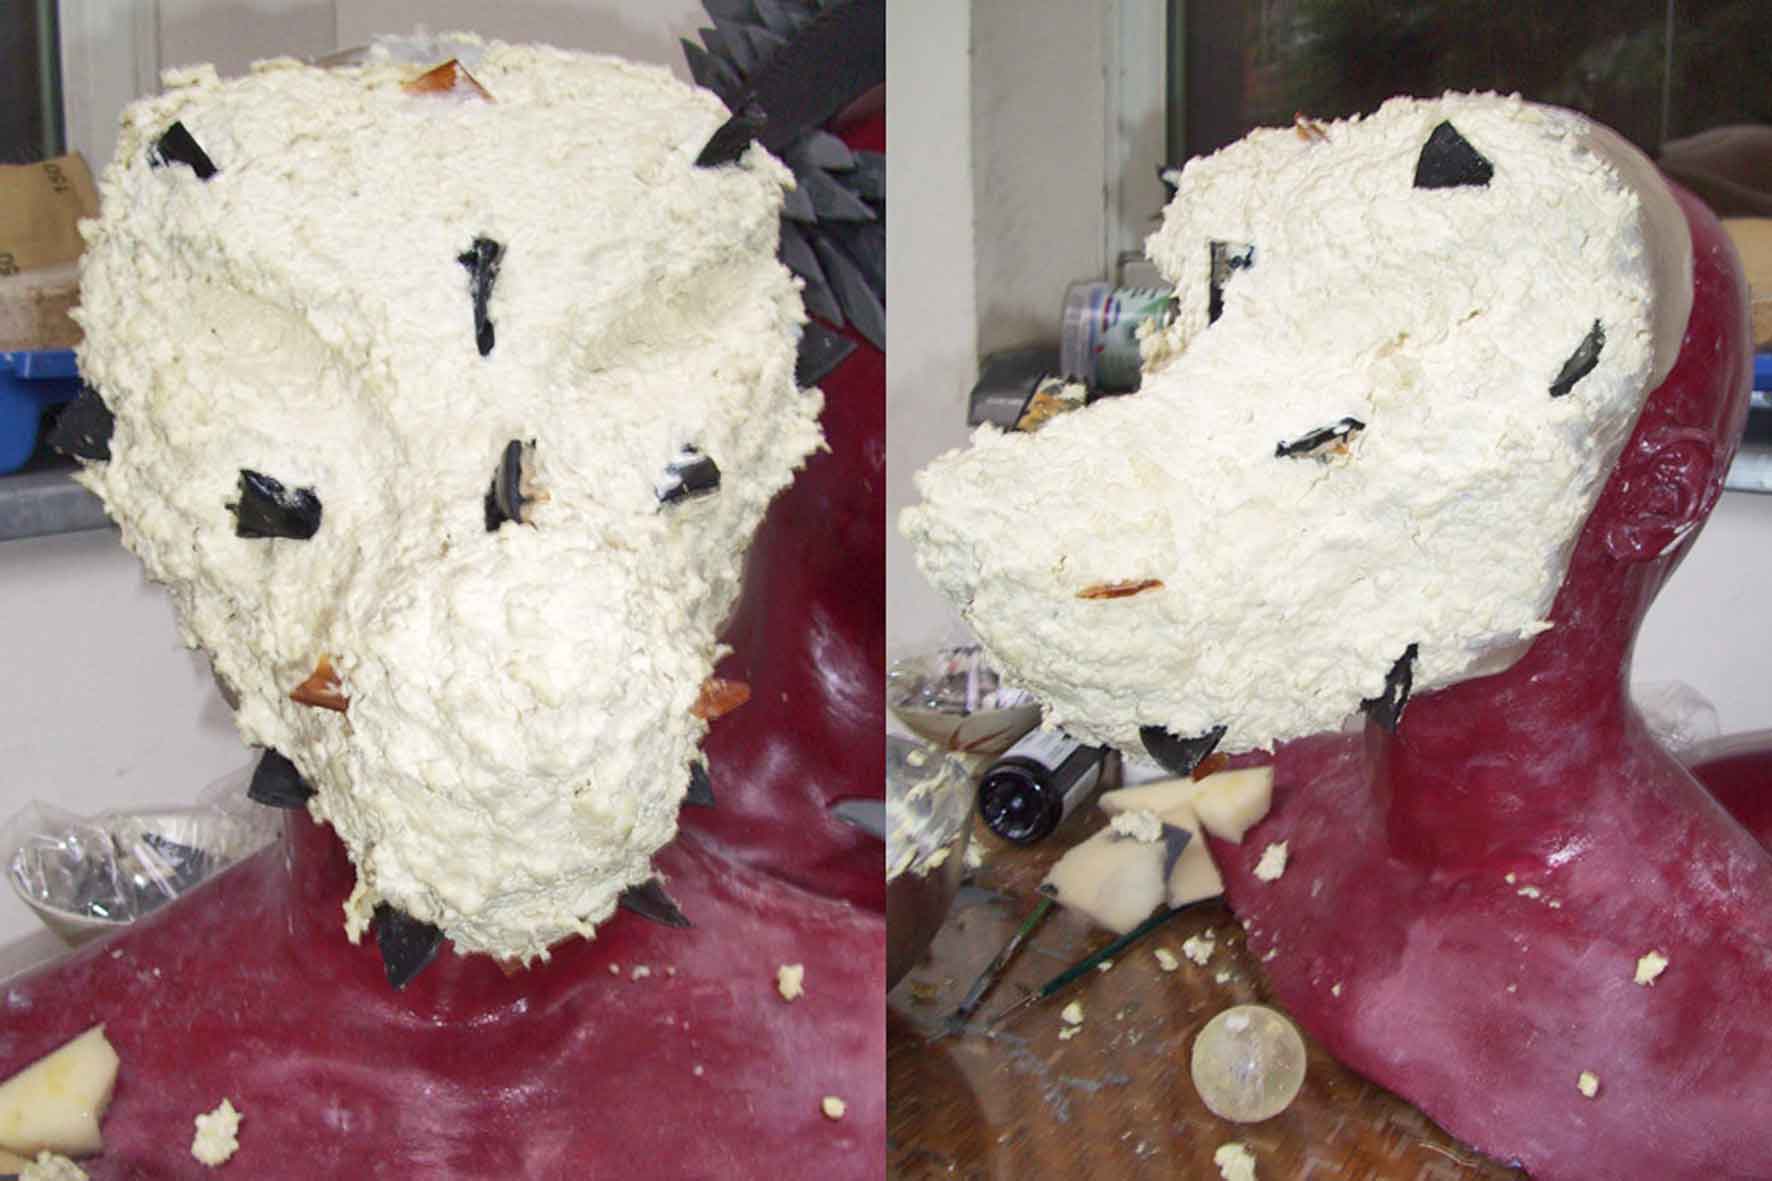
Above: Latex- cover of the clay sculpture
To get a precise cast that is also slightly flexible (and hopefully leaves the original intact) I first applied a layer of a latex-flour-mixture.
I just blended latex and flour in a bowl until it had the consistency of cake dough and slathered it onto the clay-sculpture using my hands and a spatula. It was surprisingly easy and the mixture comes off the hands just fine.
To obtain a mask from the casting form the outer hull has to be strengthened. I will use plaster for this purpose. To connect the outer plaster- shell with the latex- cast I inserted small “anchors” (dried- up leftovers from the latex- pot) into the latex while it was still soft.
I recommend to have about one litre of latex ready for making the cast. I used about 1/2 litre but feel that the brow- area could have been strengthened a little more. I took special care to fill the eyeholes so that no plaster gets in there which would impede the separation of the positive and negative casts.

YMBrW04

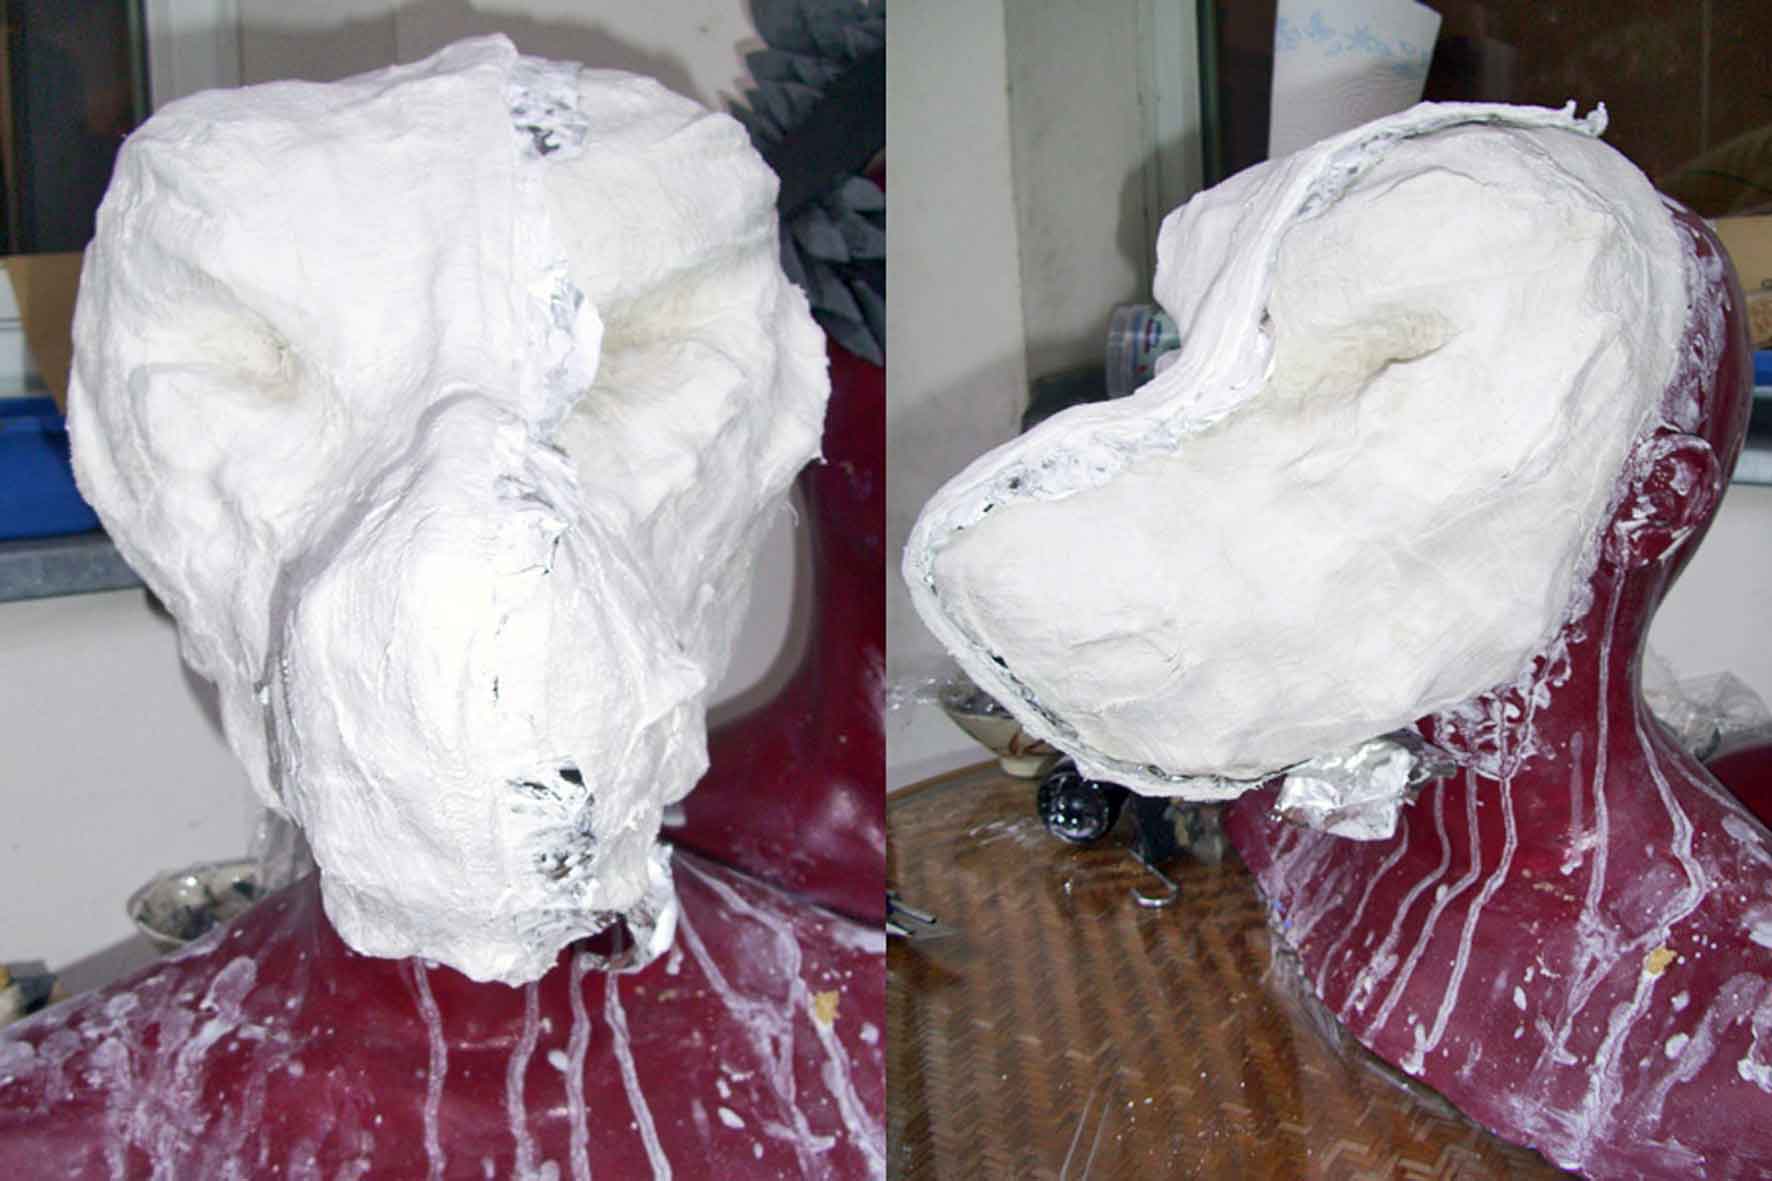
Above: Plaster cast to stabilize the soft latex- shell.
The latex- shell from the last picture would be way too flexible to cast the final mask from because when taken off the model it will not hold its shape. Thatīs why a hard outer shell is needed. I used plaster- bandages for this purpose. For this mask I needed five but for the slightly bigger one of the male wolf six.
For easier detaching from the model I made the plaster- cast in two halves: First I covered the right half of the latex- cast in plaster. When it was dry I put strips of aluminium- foil on the ridges to separate the halves of the mask, then plastered the second half.
Let the plaster dry well- at least until it cools down. In this case one night proved sufficient.

YMBrW05

Right: Linothorax.
The positive cast of the mask from the negative casting- shell.

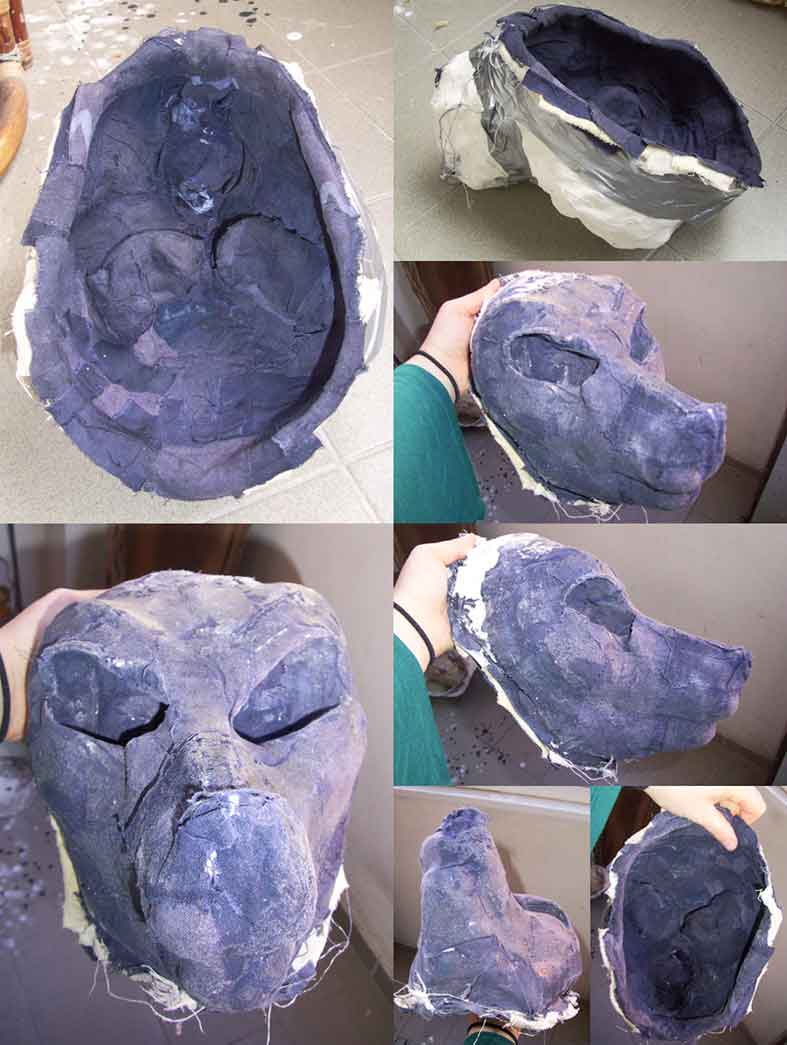
I used white and blue linen to line the cast.
The technique is from Annikaīs blog from the LarpeR-Ning (not accessible without log- in but have a look at “Annikaīs goat” on this site; Alex) although I built the mask in a negative shell, not a positive.

Left: Detaching the outer shell from the model

Seen here is the negative casting- shell from which the final mask will be made. The eye-holes have a few small flaws but that is irrelevant because they will be cut out anyway. The latex separated from the clay very well and as can be seen the clay positive sculpt (which wasnīt totally dry when I made the cast) has not been damaged; only the original eye- holes have been slighly enlarged during the separation- process.

Ok- now to make the positive cast of the final mask.


YMBrW06

The term “linothorax” originally describes a pre-medieval form of upper- body-armour made of layers of linen bonded and strengthened with glue. We know this.
But nowadays the word is more and more being used to describe the material in itself (namely a cloth/ glue- maché).
This transformation of the meaning of a word is termed “neologism” or “morphologic derivation”. To get into a fret about it is called “a waste of time and energy”.

The material is very well suited for mask- building. It is either modelled onto a positive sculpt (with the convenience that one doesnīt have to build a negative casting- mould) or - like here- worked into a negative casting shell made of a sculpt. This has the advantage that the original is replicated very precisely.
Alex

The latex/ dough- shell detached very easy; only the nose got a small rip.
The nature of the material although took for a long time to dry- the nose was still wet when I took off the shell and it lost a few layers. No problem either because Iīll use a separately- built nose of latex or sculpting- clay anyway.
Next time though Iīll cover the whole sculpt with latex and dough; I let a few parts come into direct contact with the plaster and also didnīt apply vaseline onto the sculpt as a separating agent before making the cast. Thatīs why some plaster stuck to the mask when I took it out of the shell. I can live with that too because later fur will be applied.

Now to cut out  and clean the mask prior to adding joints and foam.

YMBrW07

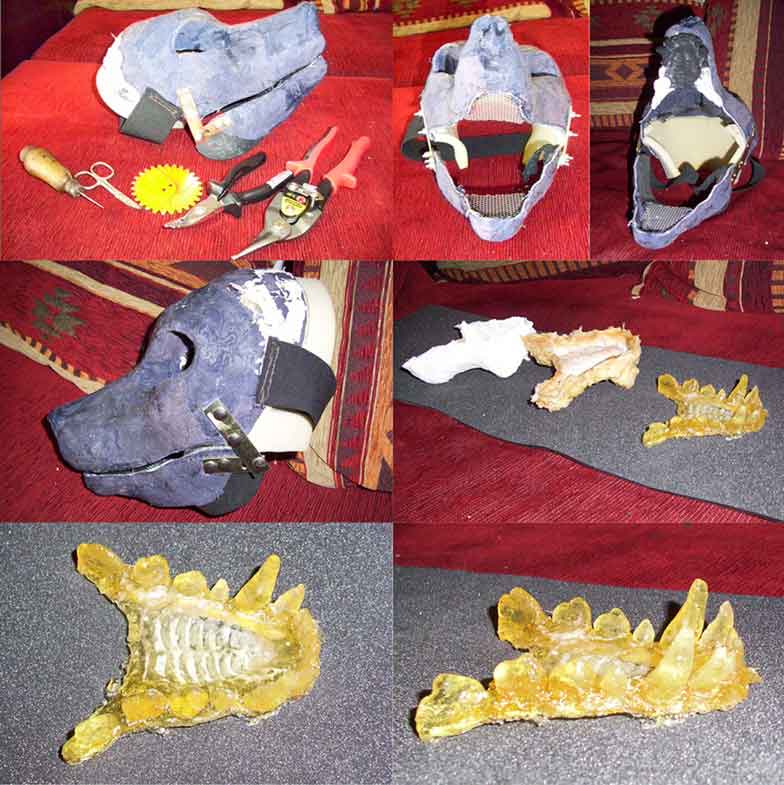
Left: Edges are cleaned, attachment parts are added.

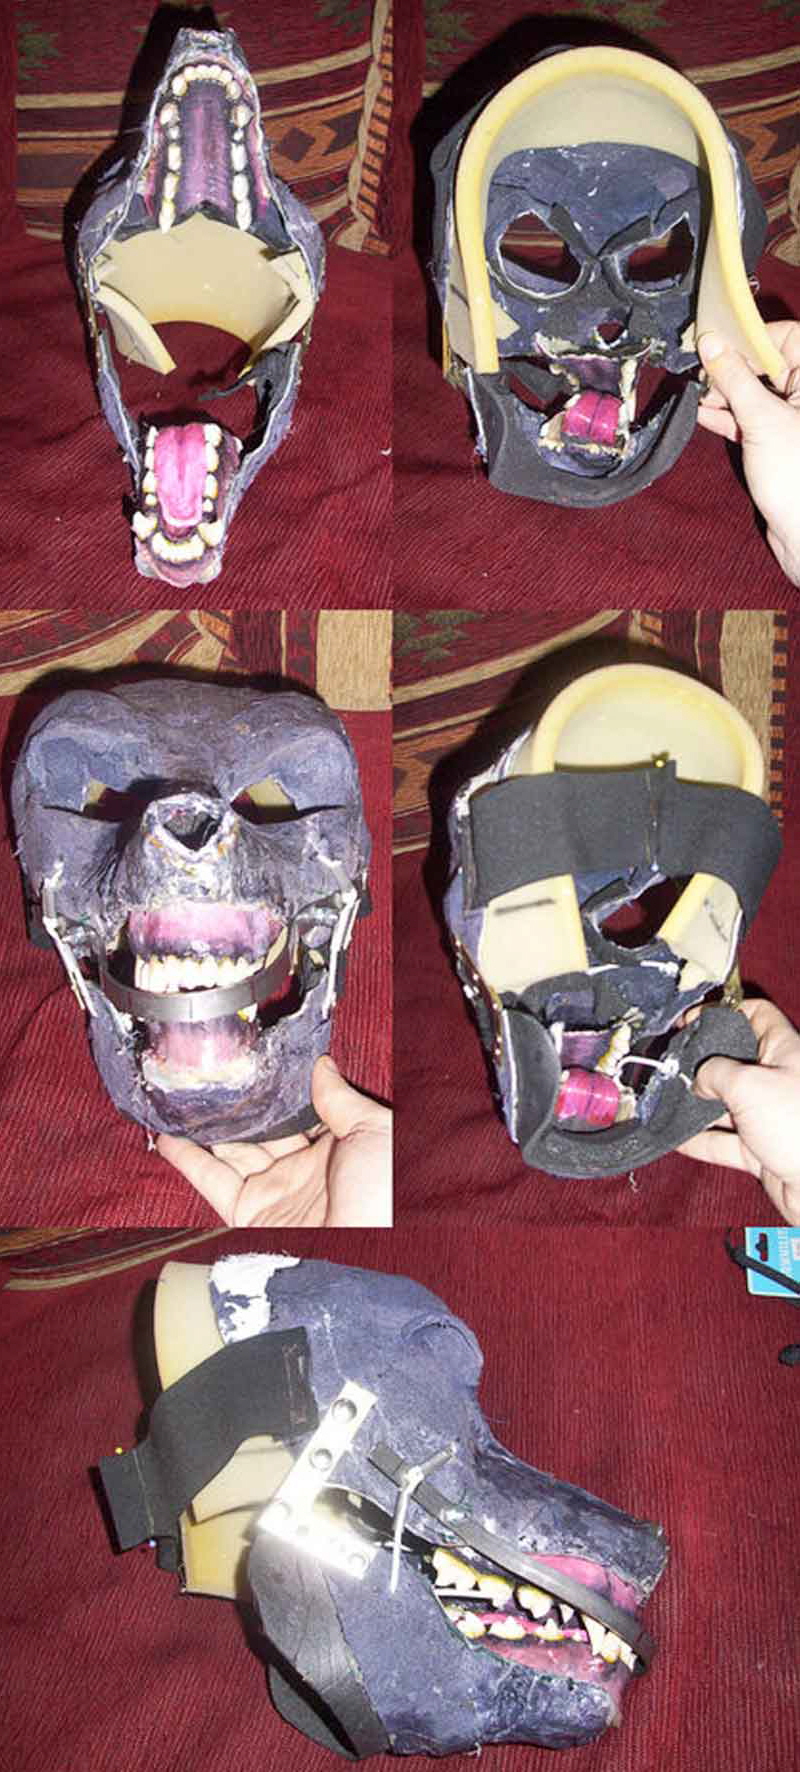
The joint
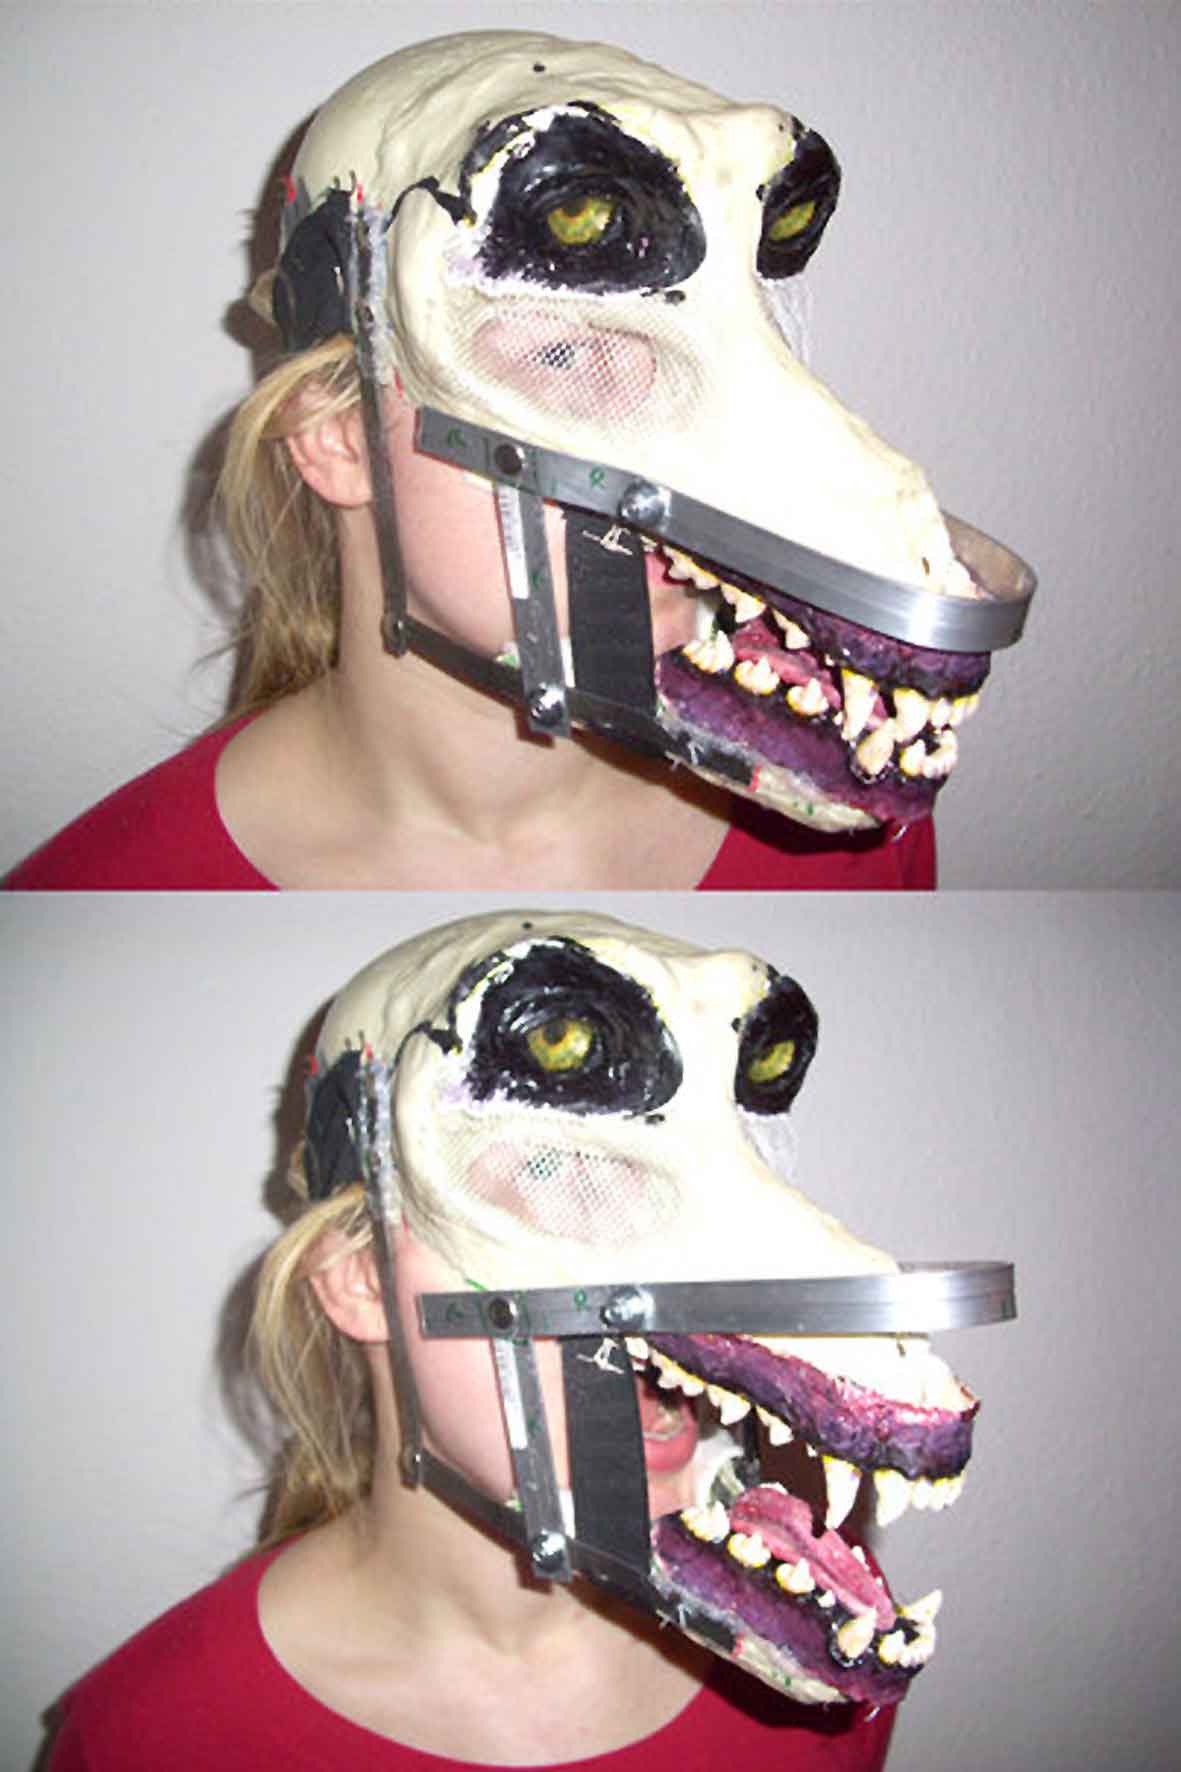
Initially I built the lower jawīs joint with punch pliers, metal plates, screws and nuts. It was quite difficult to determine the right position. The screws and nuts kept coming loose so when everything was in place I riveted the connections. That worked well- the heads donīt stick out and stay tight.

The gums
I first sewed a mesh wire frame  into the jaws with big stitches. To make the holes I used an awl. Then I modelled the gums with “Fimo” (an air- drying modelling- clay). From this positive sculpt I again made a negative casting- shell from latex and dough with a stabilizing hull of plaster.
The final shape was casted with 3 layers of amber casting resin.

It all worked out really well. The gums are stable and look good.

Now to the mistakes I made:
1. In the first try I made the gums too broad and set them too low into the jaw. So I cut off a piece of the mask and rebuilt the gum.
2. I used the wrong “hardener”, making the cast gooey and useless.

But the technique itself works well and I look forward to using it in further projects.

Right: Jaws and gums
As already said above this time I tried out a modelling clay that can be backed in the oven (the german name is “Fimo”) and the result is quite satisfying.
This is my fifth try modelling wolvesīgums and I am getting the hang of it. Oven- bakable modelling clay has proven the most suitable material; air- drying clay is too brittle for modelling small parts and normal modelling clay that later gets cast is too soft- you work on one tooth, the next one gets deformed etc.
I first modelled and baked the roof of the mouth. The gums are set on mesh wire plates which I later sewed into the jaws.
First backing the upper gum had the disadvantage that I had to completely match the lower gum. The benefit on the other hand is that I got a stable shape that didnīt distort while being fitted into the jaw.
The lower incisors are a little too bulky for my taste and seem to stand out too far. I have to see if this look changes with the lips being installed or if the lower gum has to be redone
.
I painted the gums with acrylics from a cheap provider and then laquered them with a clear varnish.
The teeth are unpainted because I used an effect- clay called Fimo- Transparent. They seem a little too clean but have the semi- translucent effect of real teeth.
I also shortened the chaps and cut a hole for the nose which I will later model. The cutting made the cloth- glue- maché fan out and it became too flexible. I repaired that with more glue.

YMBrW08
YMBrW09

Left: Gums
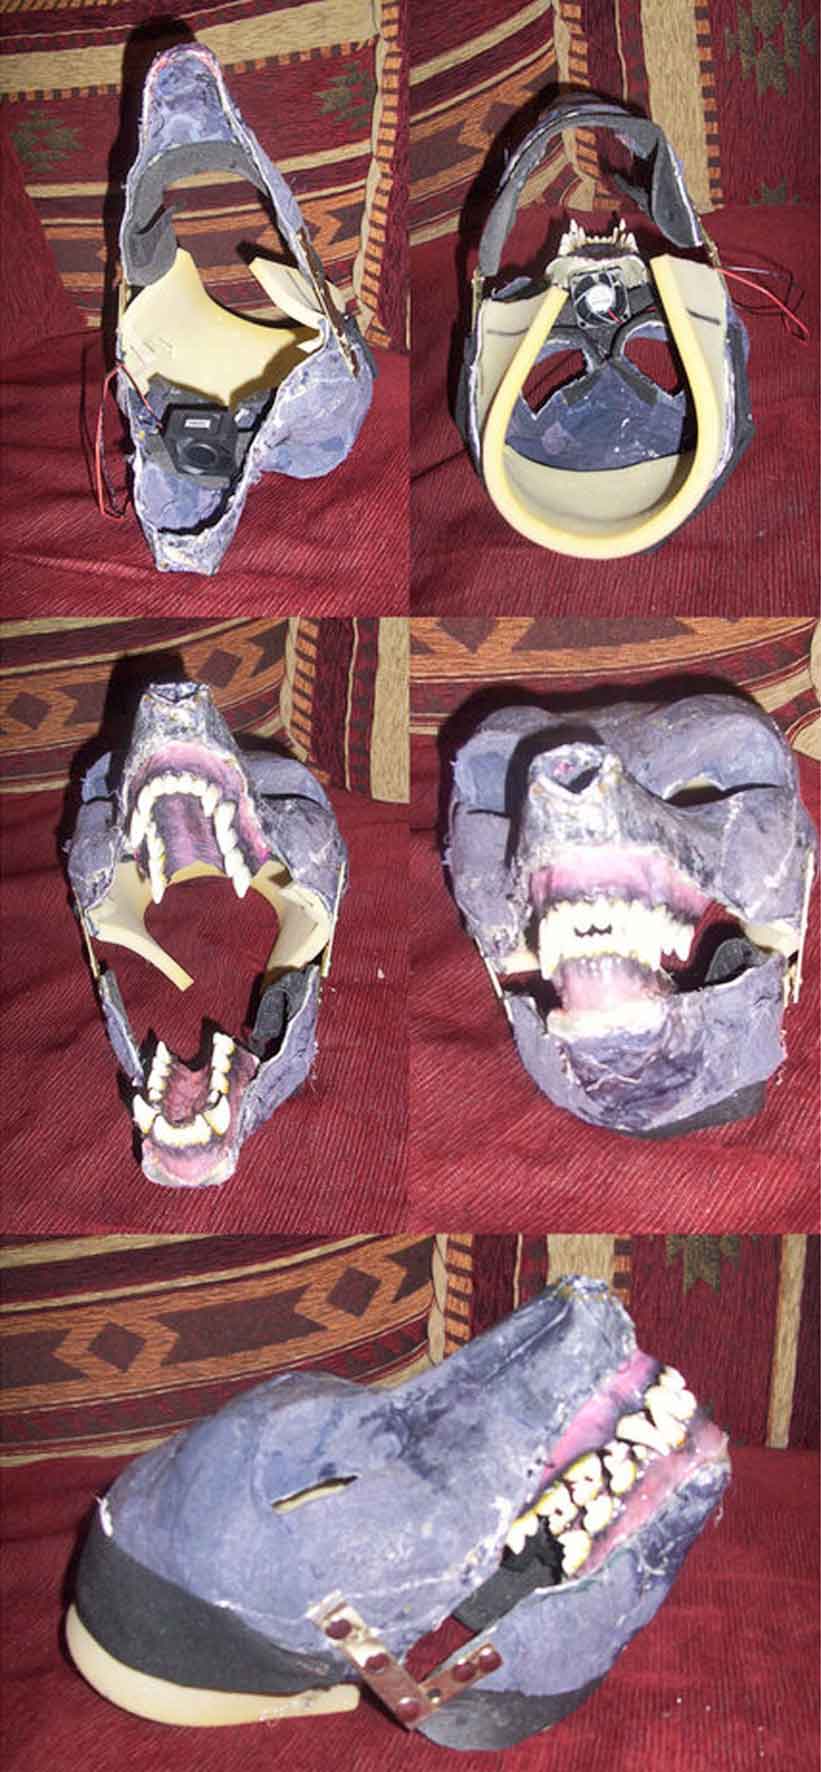
The gums and teeth from the picture above were definitely too big. When I opened my mouth to the max under the mask they still overlapped. Eating was not possible either. So I made another set of gums like described above. From this I made a latex- cast and  out of it a light positive using quick- casting-resin and fibreglass- mats. I painted it with acrylics and clear varnish.
Then -using hot glue- the new set found its place in the maskīs jaws.

ventilator- mounting
Before glueing in the gums I mounted a foam- retainer for a fan. The gums have to sit a little lower that way but I think the resulting comfort will be worth the small change of the look.

tongue
The tongue was carved out of black foam and shaped using nail scissors and Pattex. Then it was latexed, painted with acrylics and covered with Isoflex laquer (a varnish suitable for sealing the surfaces of foam weapons). I glued it into the lower jaw with Pattex.
(Thanks to Attic Art by the way who have proven a reliable supplier of Latex and Isoflex. Your packaging is great, they donīt stick together much and thus waste less material).

jaw- joint and chaps
In a fursuit- tutorial I read about the idea of flexible chaps that move when the jaws open. Since then I have tested various approaches. Flower wire for example proved too thin and tended to deform (even more strands twirled together). I also attached a rubber band that keeps the chaps in normal position when the mouth is closed.
I am still dissatisfied with the rubber band that connects the chaps- lifting- mechanism with the lower jaw and is supposed to set it in motion when the mouth opens. Iīll test some other materials like metal plates or package tape in the coming days.

Right: New mask
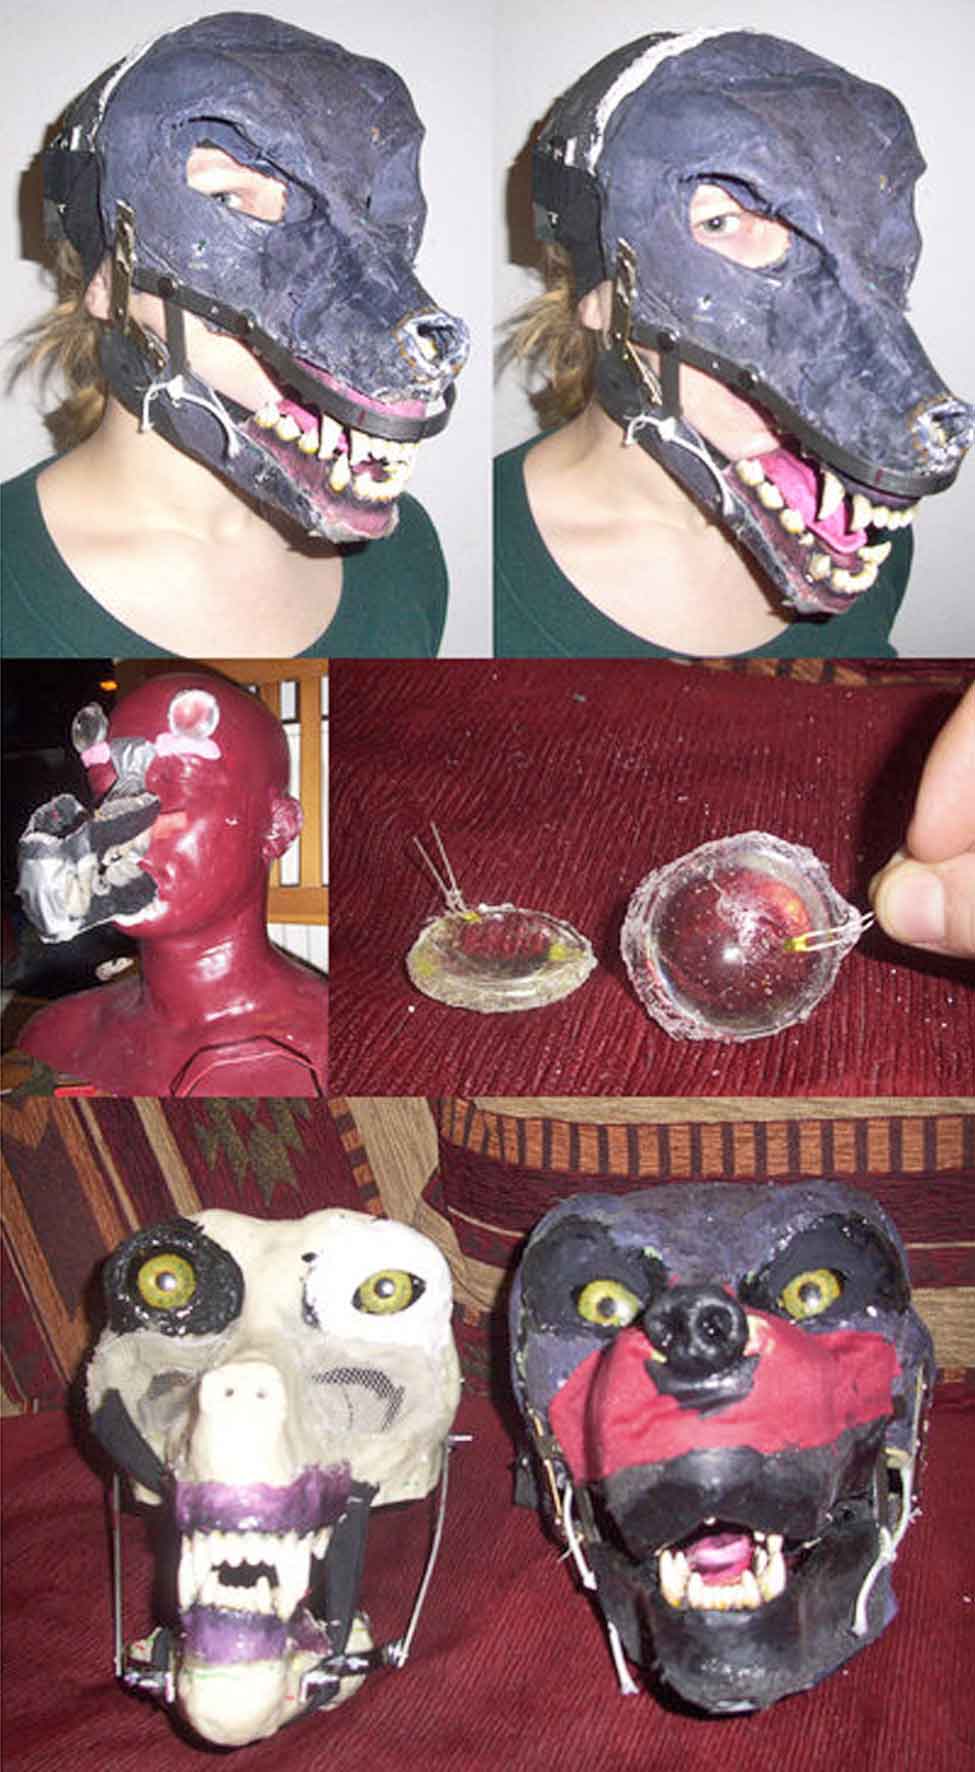
When it came to inserting the eyes into their designated places it turned out that the field of vision is extremely impaired (pictures above).
I also built the eyes as full orbs that had a way too strong “follow-me”-effect and wanted to replace them with more shallow ones which in turn made a mask-shape with very deep-set eyes unnecessary.

So in order not to keep struggling with shoddy work all the time (and for a few other reasons; for example Iīd like the top of the mask going over the head to better accept the jaw- mechanism) I did another mask.

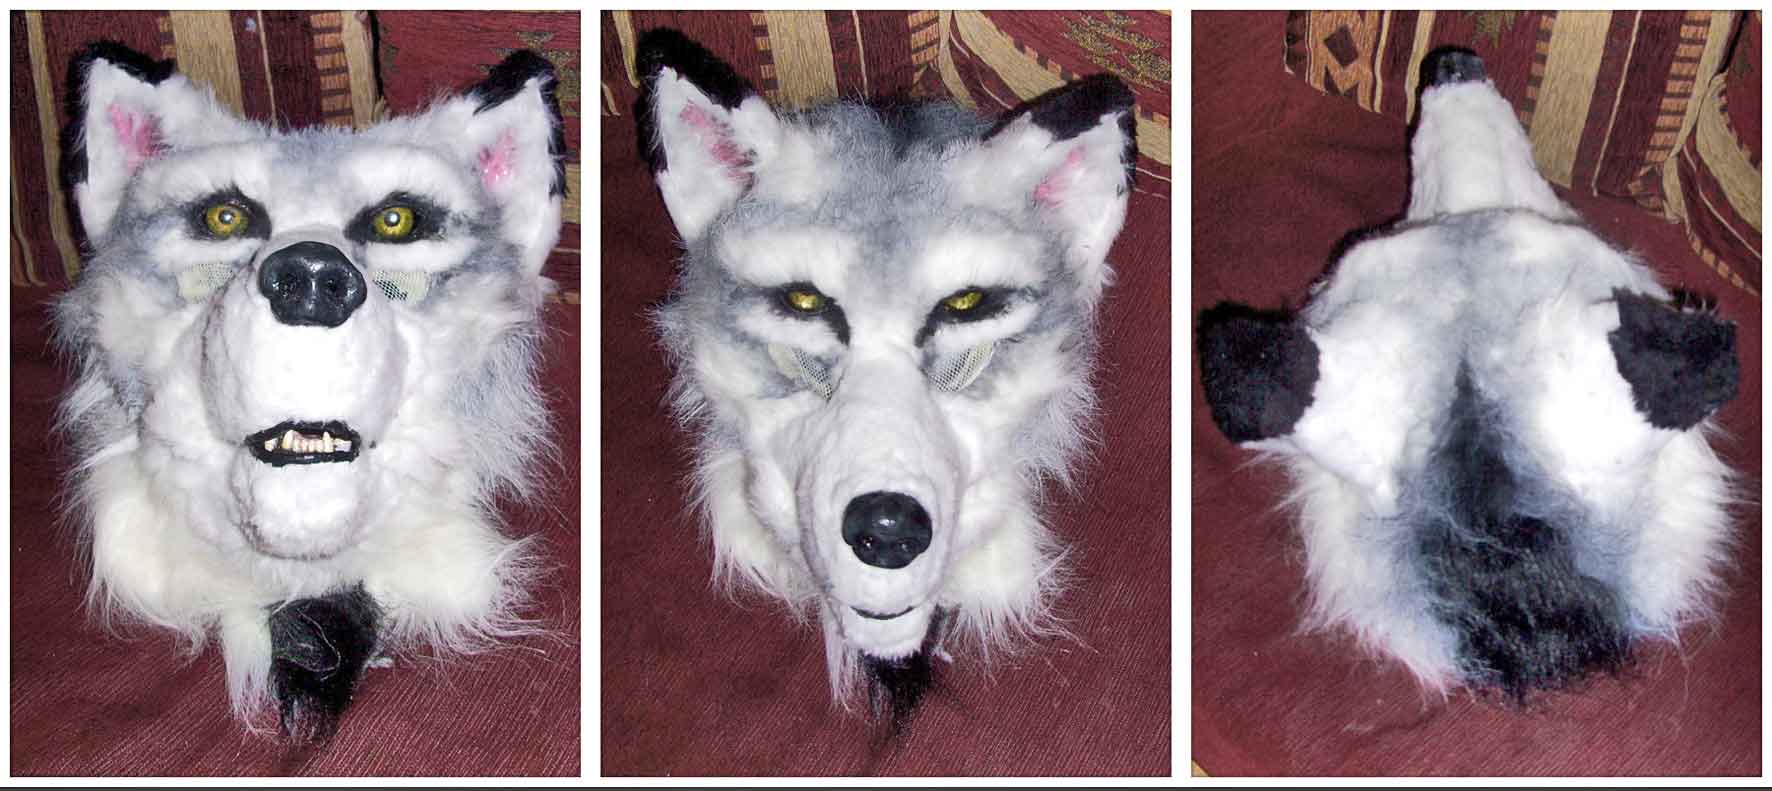
This time I casted it in resin and strengthened it with fibreglass. Also I first set the jaws instead of installing them in a finished mask. The fake eyes this time are arranged above mine on the brow. I see through mesh- covered holes in the cheekbones (see in picture below on the left the new and on the right the old mask).

I plan to install the old one in a quadsuit (a four- legged creature).

YMBrW10
YMBrW13
YMBrW14

Above:
Eyes
The eyes are made of 2 halves casted in the form of a painterīs palette. The separation agent to be able to get the shapes out of the casting- form has to be good or the shapes will stick. I also molded in an LED (light emitting diode) per eye which are only barely visible when the eyes are painted.
Then the eyes were glued in (remember to solder the cables of the diodes first) and I sculpted eyelids with air- drying modelling clay.

Jaws
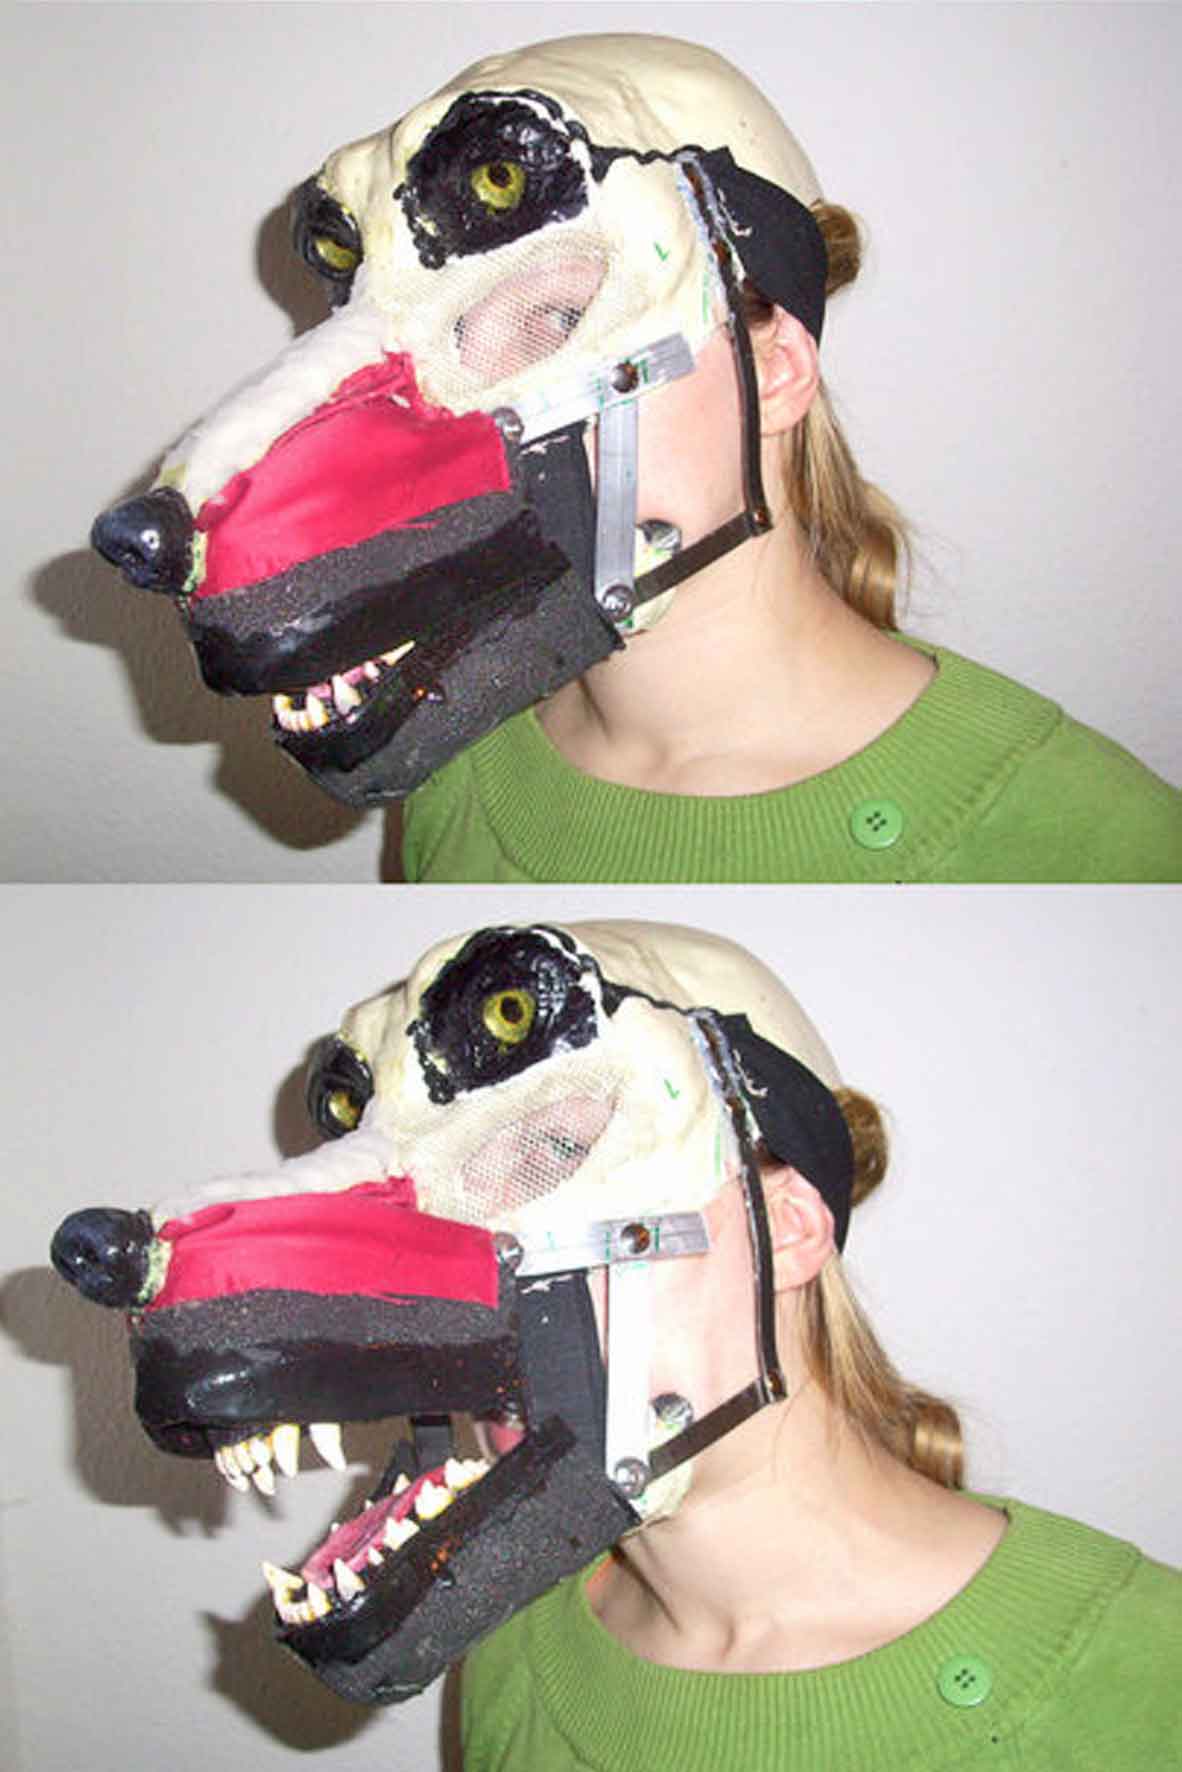
The jaw mechanism is similar to the okld one and also has moving chaps that retreat when the mouth opens. In thge version above on the right the nosebridge is a little too massive and the nose itself looks too prominent. I changed that.
I think Iīll work with this mask and adjust the proportions using carved foam. The next mask will have a slimmer nose.
For the stirrup around the upper jaw I used an aluminium strap. The chaps are made of thin foam mats that I latexed to get the right look. Two layers of cloth connect the chaps with the aluminium stirrup and the nose bridge. To smoothen the edges I used fleece liner.
The final form of snout and nose bridge was achived by adding another layer of foam that was then carved and smoothened with scissors and a flexion wave tool.

Nose
The nose was first sculpted with air- drying clay. Then I made a mould from latex and casted the positive shape. It was coloured with acrylics and sealed with Isoflex. This makes the lose look “wet” and protects it.
But perhaps Iīll sculpt it again with slightly different proportions.

YMBrW15 YMBrW16

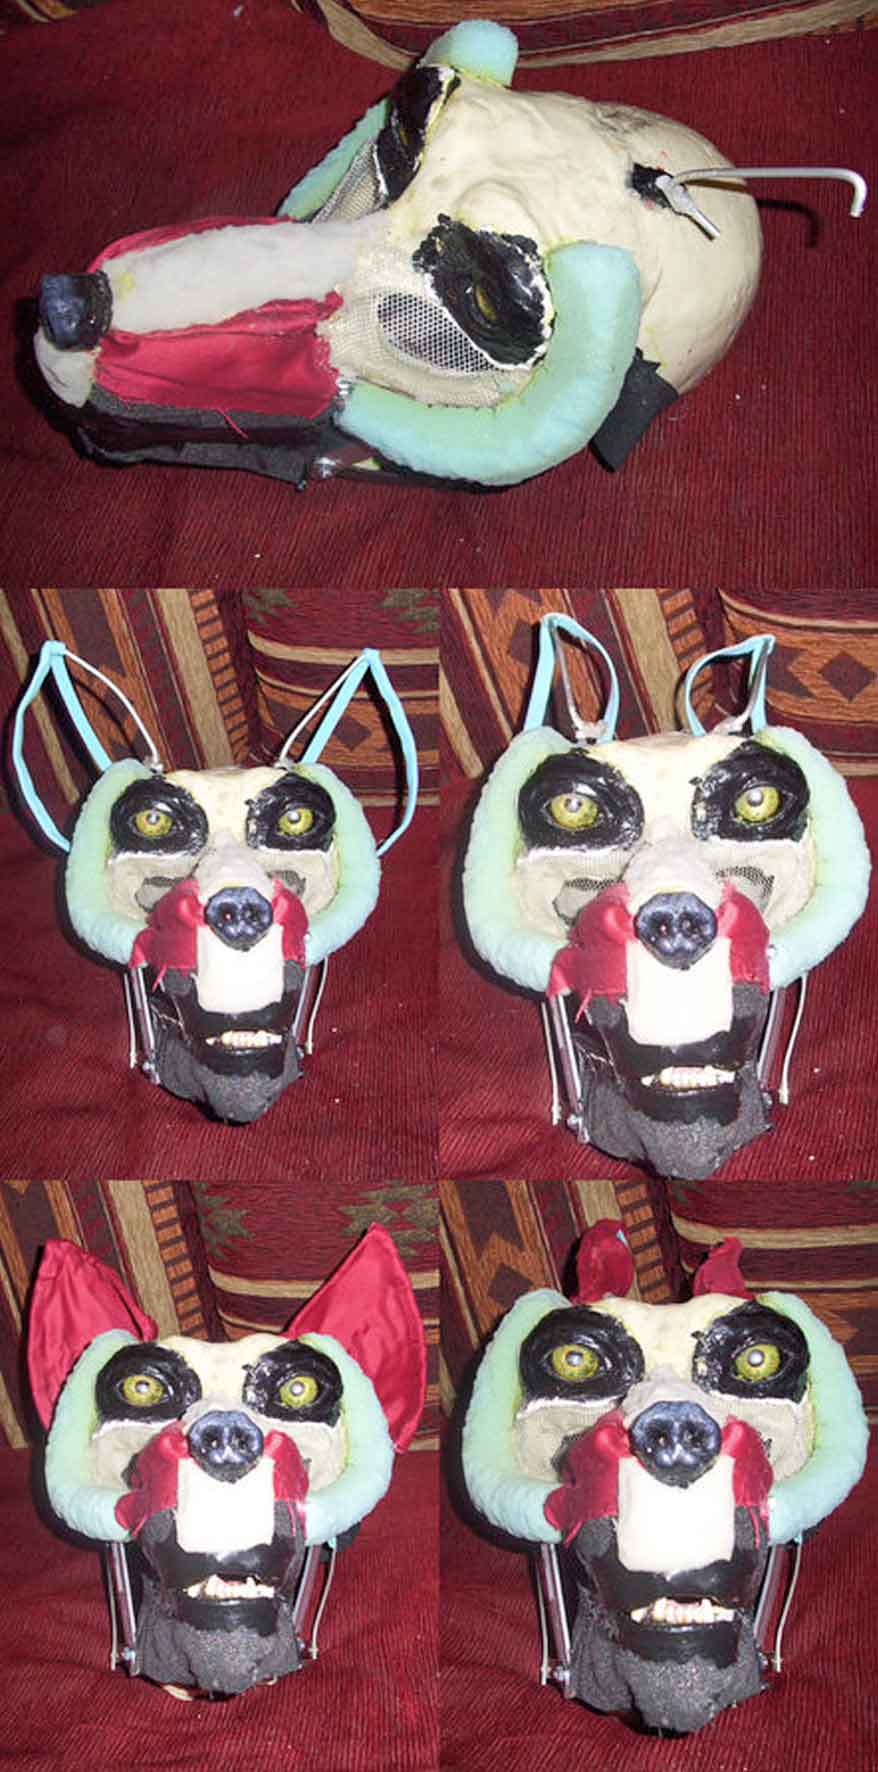
Above: Ears
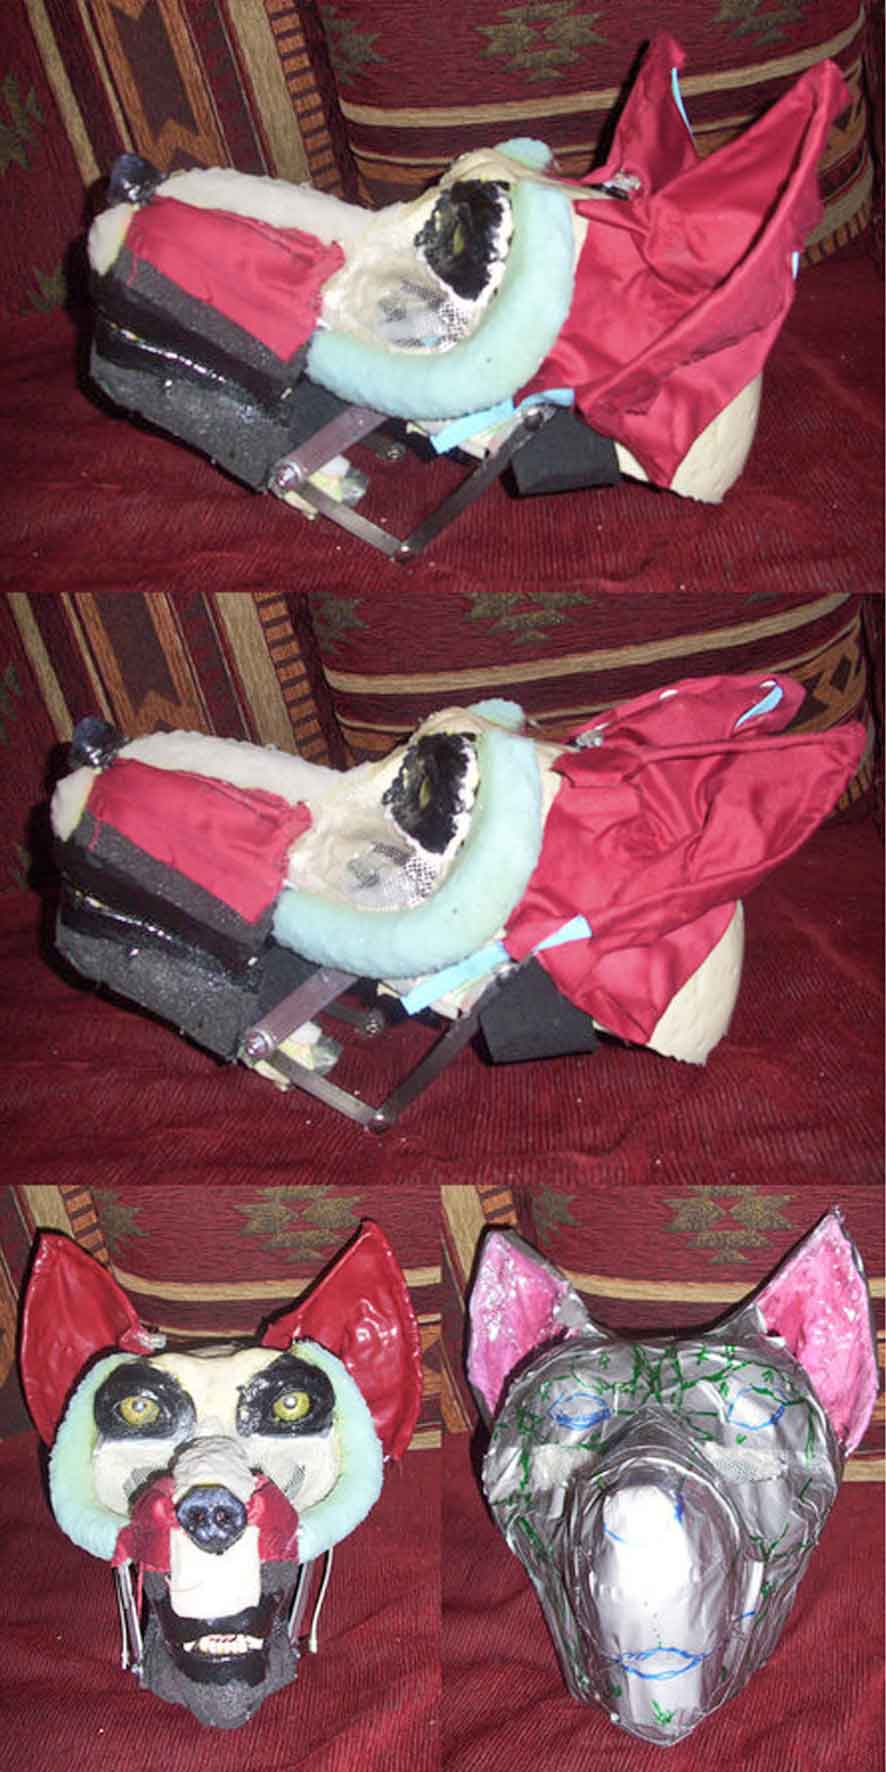
The mask can do big ears with the help of two servos. First I drilled holes in the top of the head which host most of the servosī bulk. The motors are fixed with hot glue. On the servos I attached aluminium tubes. The picture shows the first test; later I used a disk as support and bend the alu-tube in hook- form for better fit. The rest of the earīs flexible shapes as are made of foam rubber.
Then I furnished the ears with cloth and coated the insides with red- coloured latex. The latex again was painted with acrylics and sealed with Isoflex.

On the last picture the mask is wrapped up in tape from which the paper patterns for the application of fur will be made.

Further changes are the sidesī foam reinforcements and more modelling clay arond the eyes to create a more wolf- like look.

The next step is fur.

YMBrW17

Above: Fur
The paper pattern for the required fur parts was made using tape and clingfilm to roughly determine the required shapes.  Then I glued them onto the mask using Pattex Transparent and hot glue.
I took out the servos again because I donīt really like the mask but have no more time to make another one before the events I intend to wear the costume at. Iīll install them into version 3.0.
I also redid the nose- the first one was too small.
The fur now has to be dressed, trimmed and coloured.

Above, right side
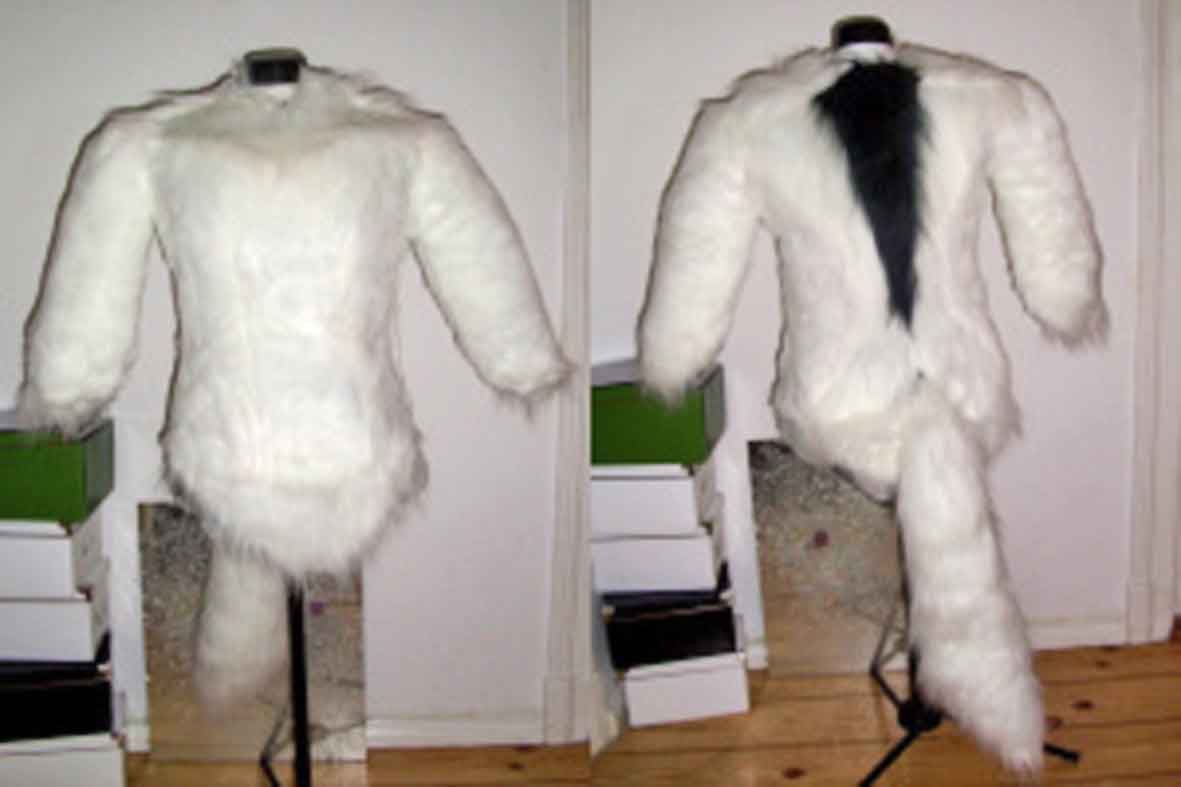
The finished parts until mow: Mask, upper body, tail, gloves. Legs are still missing.

YMBrW18

Above:
Sat down yesterday for a hour and started to paint the head with bristle brushes and acrylics.

For my taste the head is too big in relation to the body. I also think the space between nose and mouth is too big. Unfortunately these are things I will only be able to correct in version 3.0.

But I like the way the colours take shape. The mask benefits from the new contours. They also  take away much of the plush look.

This is the state of the project until march 2011.
The documentation shows fair and square the straits, troubles and difficulties one has to contend against to produce a result- up to the most radical of all problem solutions: new construction.
Nobody is spared this (see for example my heavy egyptian armour). But nevertheless not one of these “unsuccessful” attempts is in vain- they all are ways well suited to travel and serve as tutelage and inspiration.
When you scratch build “things” as complicated as these yourselves you will know the phenomenon: you have to learn to love your creatures, for they are but a weak portrayal of what you had in mind originally.
But in honesty: take a look at the solemn, dignified face of the wolf above left- objektively it is quite far from “unsuccessful”.
Alex

The body

YMBrW22
YMBrW23

Left and below: upper body
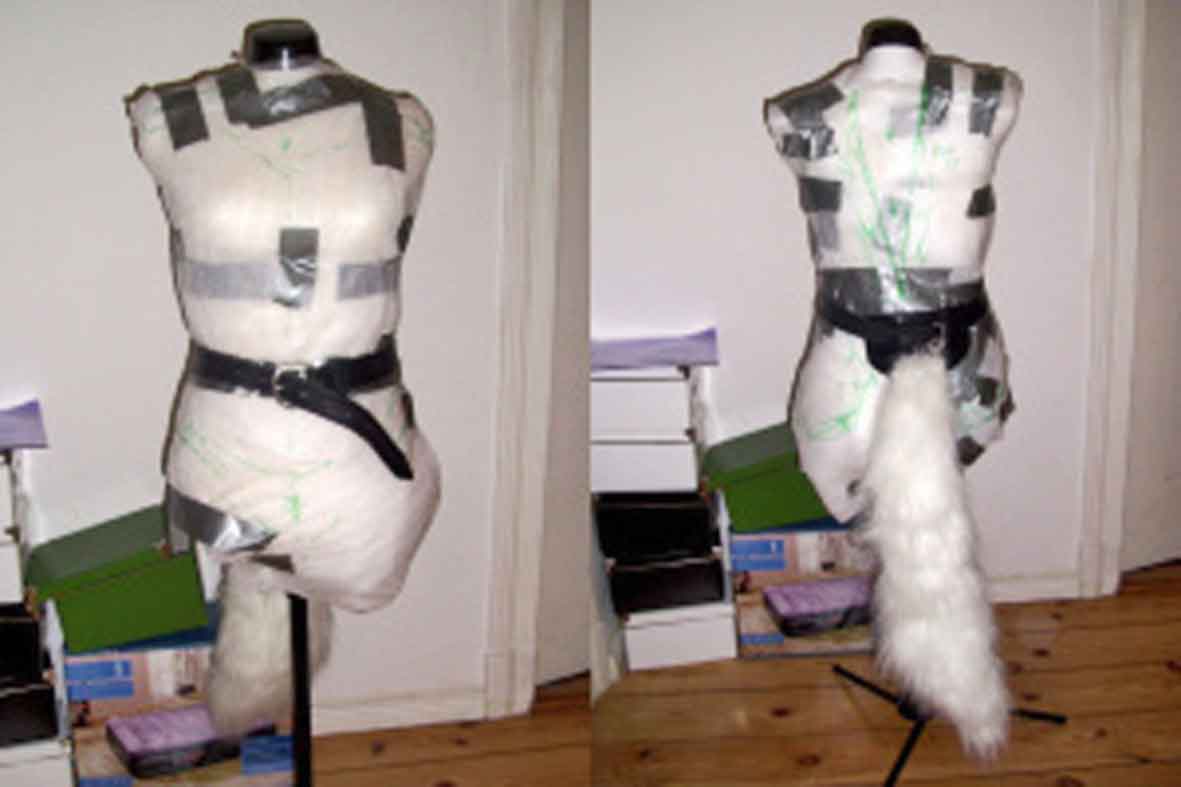
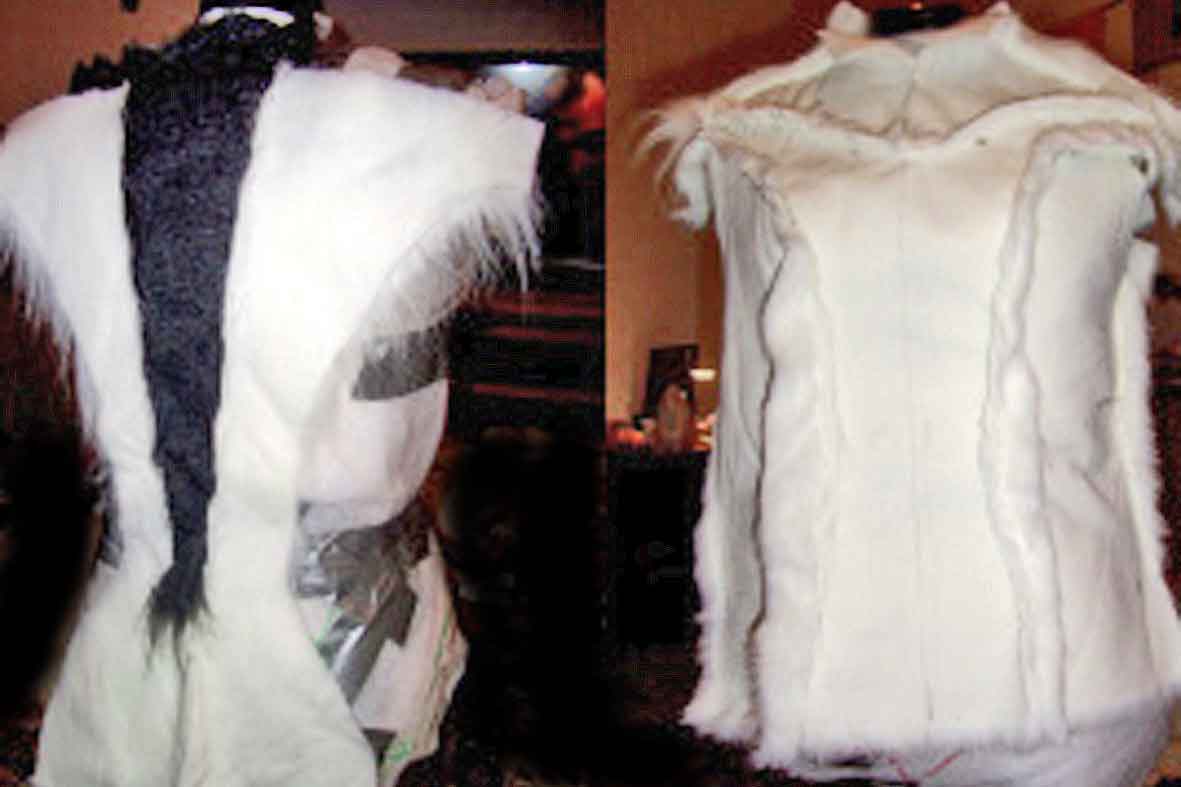
A friend borrowed me a tailorīs dummy which I brought to my measures with tape and packing materials. On this I drew the paper pattern of the fur as I envisioned it.
Then I roughly cut the fur, always paying heed to the nap of the hairs.
Better make the parts a little too big to  have enough protrusion for sewing it together comfortably.
I then connected the pieces and attached them to the mannequin using pins.
Then I replaced the pin- stitches with real seams.

YMBrW24

For a good a fit as possible I sewed a covert zip on one side under the arm. This makes it possible for me to get into the costume all by myself which was important for me.
The coattail- like bottom under the tail is held together with velcro tape.
Maybe Iīll also connect the jacket (upper body) with the trousers (legs) using velcro but Iīll make these connections when both pieces are finished.

The next step will be to trim the fur and then colour it. I want a light grey wolf and the thought of producing a good gradient using only brushes and paint makes me tremble a little. I donīt have access to an airbrush- set but I think if I work meticulous the other technique will do.

YMBrW25 YMBrW26

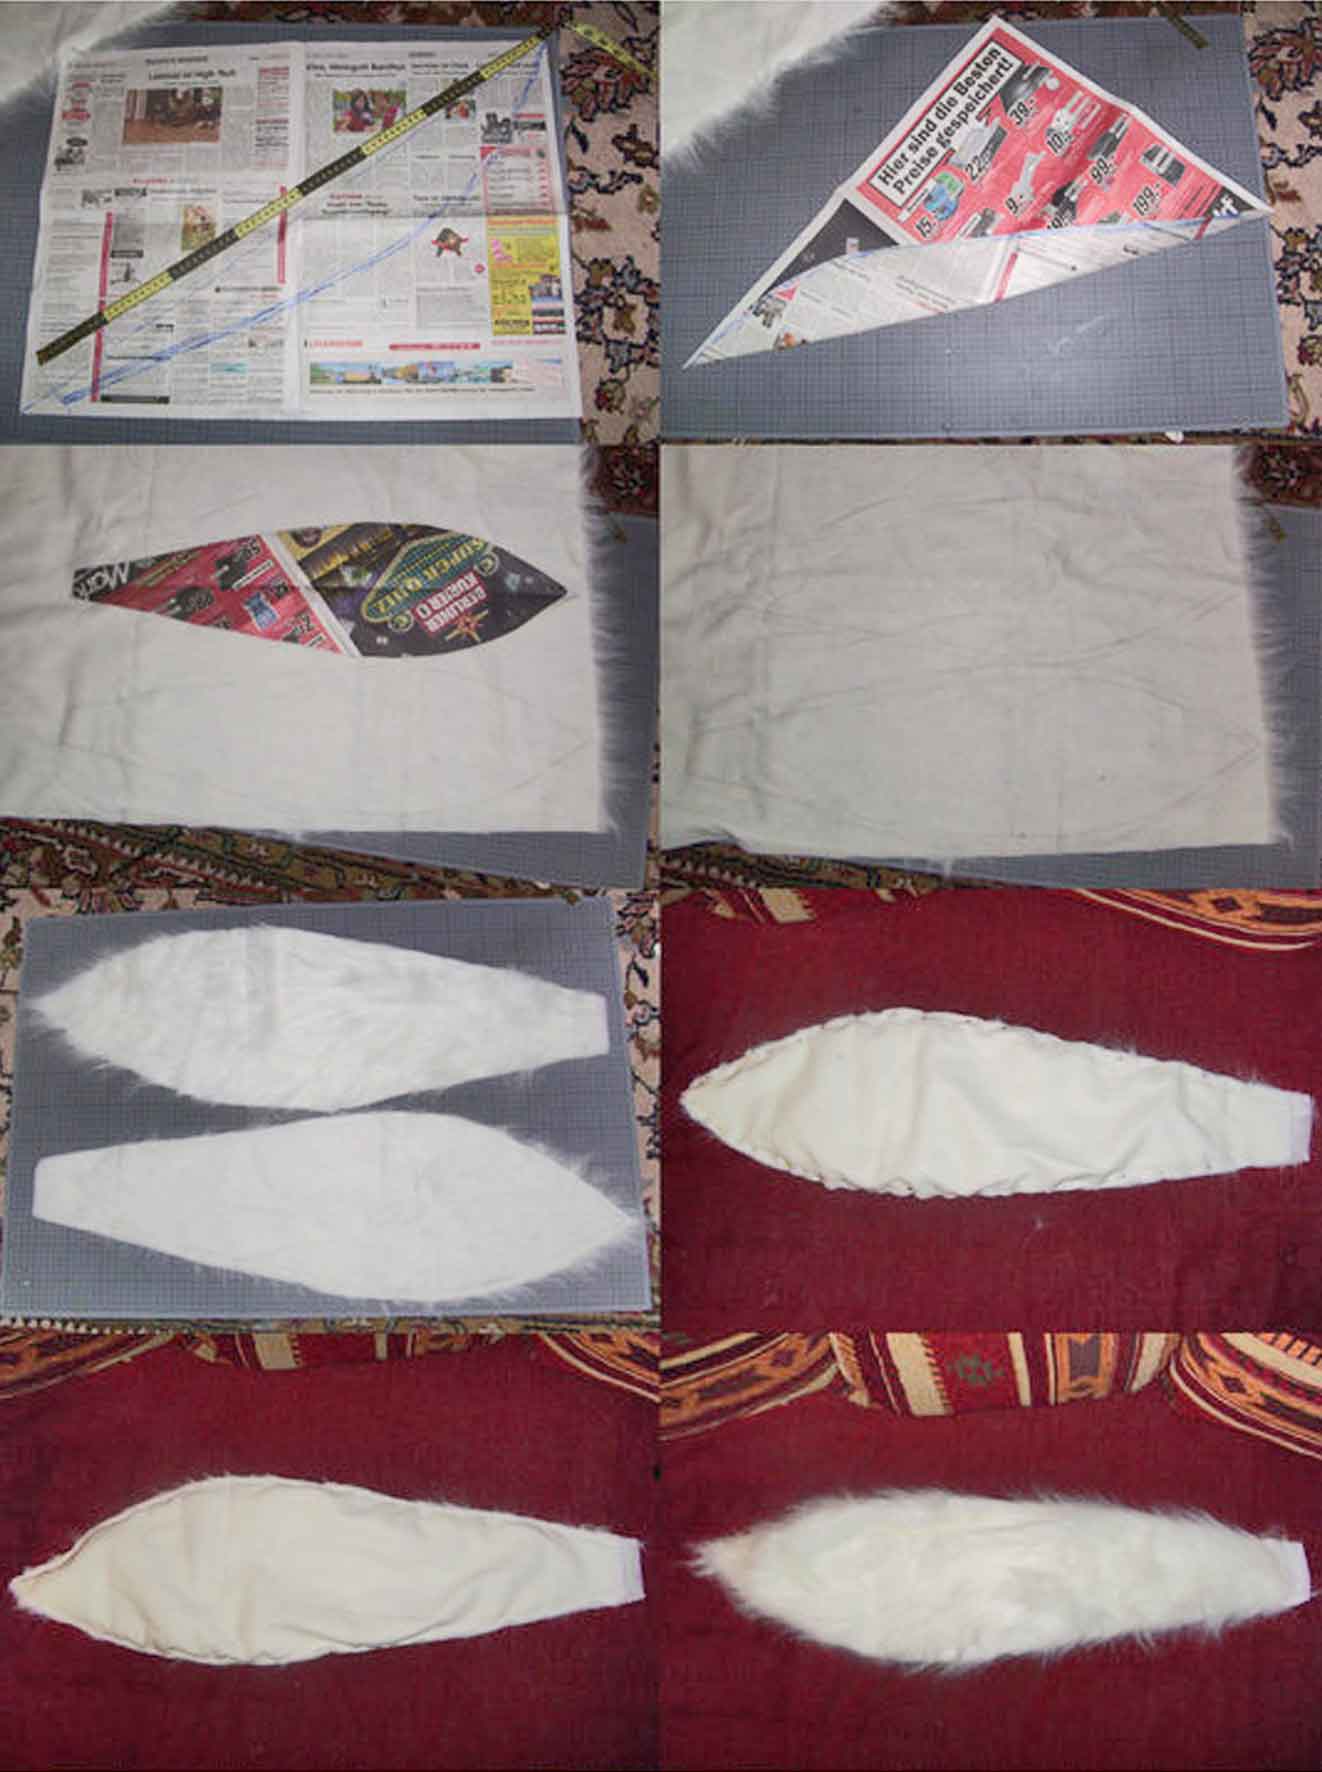
Above: Tail
First I cut the tailīs approximate shape out of a newspaper. Then I transferred it onto the artificial fur (again: pay attention to the furīs nap (the direction the hairs point in) and sewed it together.
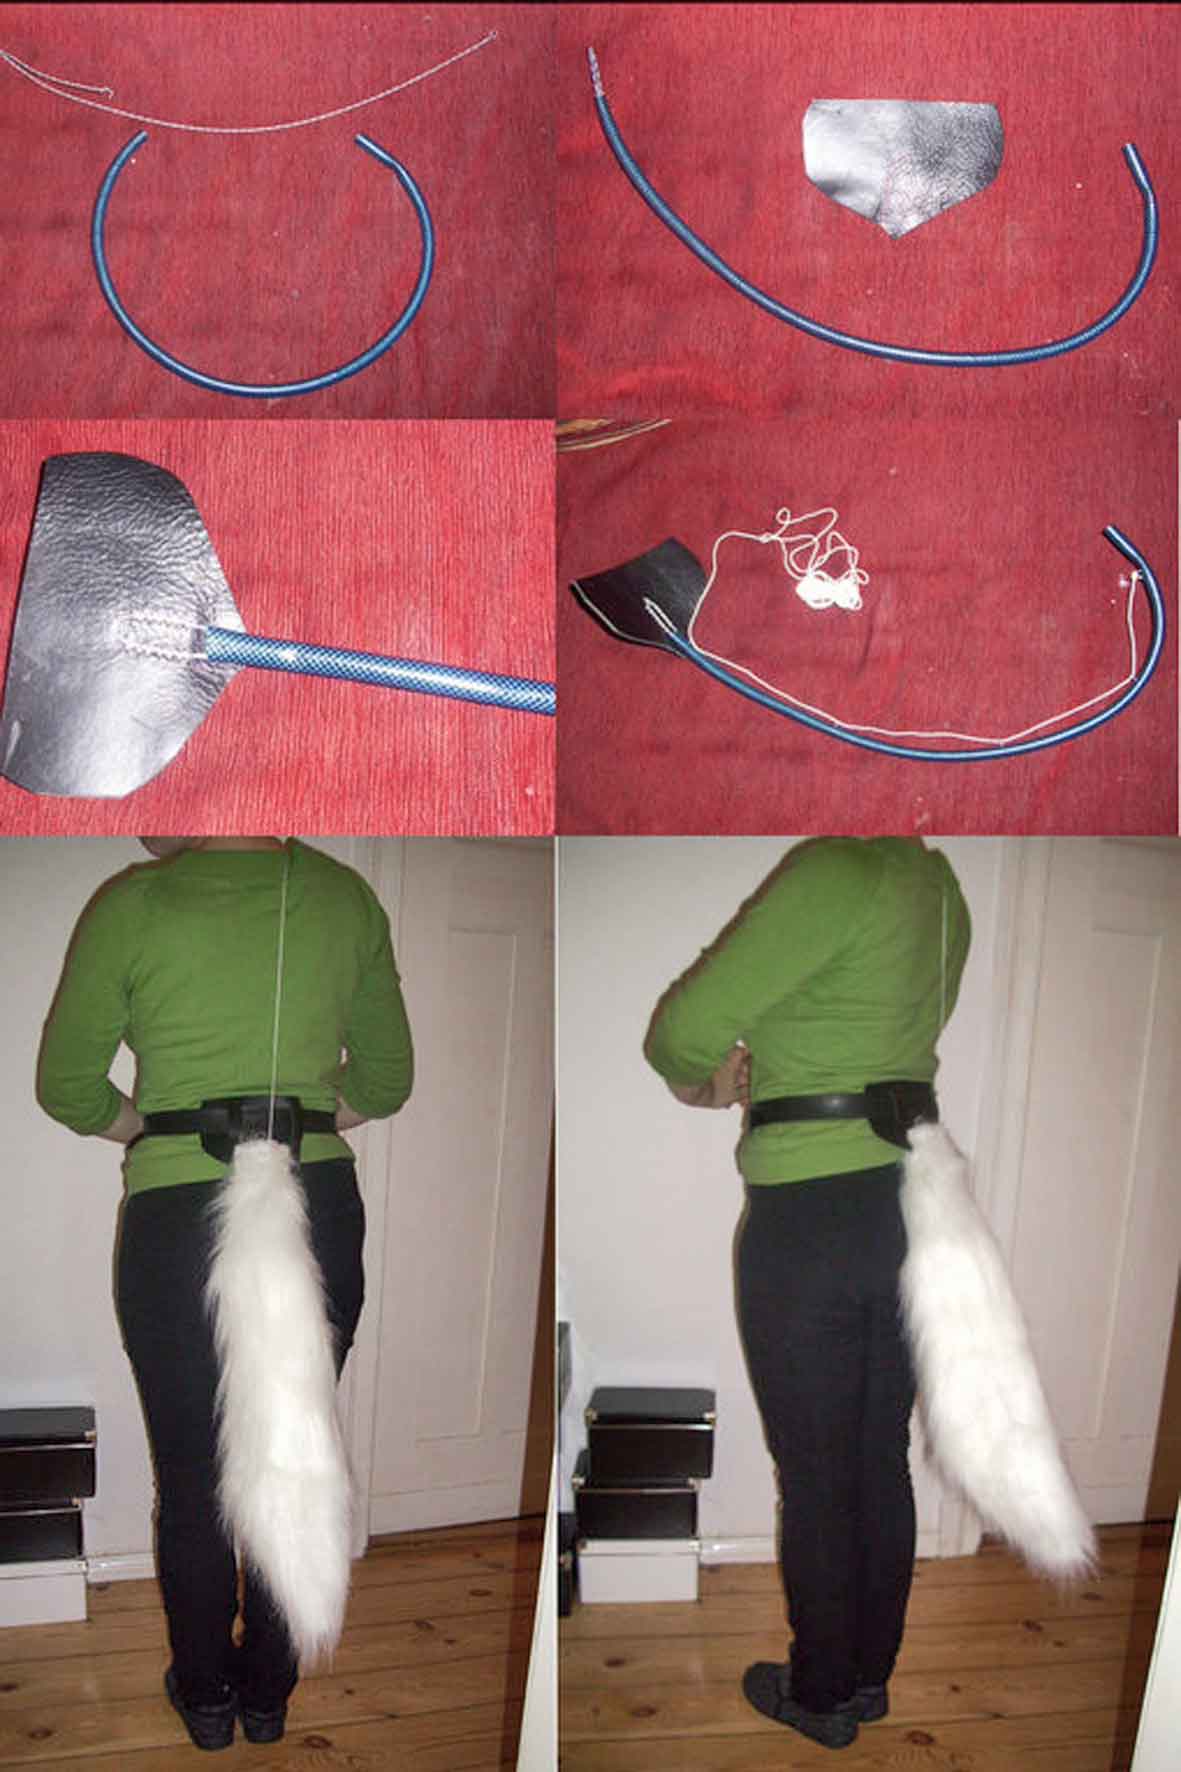
As inlay I used an about 80-cm-long piece of garden hose. Later I cut off about 15 cm because the tail looked too fox- like.
I glued twirled floristīs wire with hotglue into the hoseīs end and used this to attach it to a piece of leather.
The small screws and the white cord are a test to make the tail movable respectively tense it a little later. It moves not quite as I intended but anyway I donīt want a real “moving tail” because these look too cat-like.
The tail is stuffed with tailorīs filling fleece. Previously I attached the tailīs fur ends at lugs I glued onto the hose with hot glue to prevent the hose from warping inside the construction. Thus, the fur stays in place.
The pictures show the first version (I really need a big mirror). It looked too much like a foxīs tail but because shortening is easier than extending I could unstitch the thing and shorten it a bit. The final shape is much more suitable for a wolf.

The claws

Right: Claws

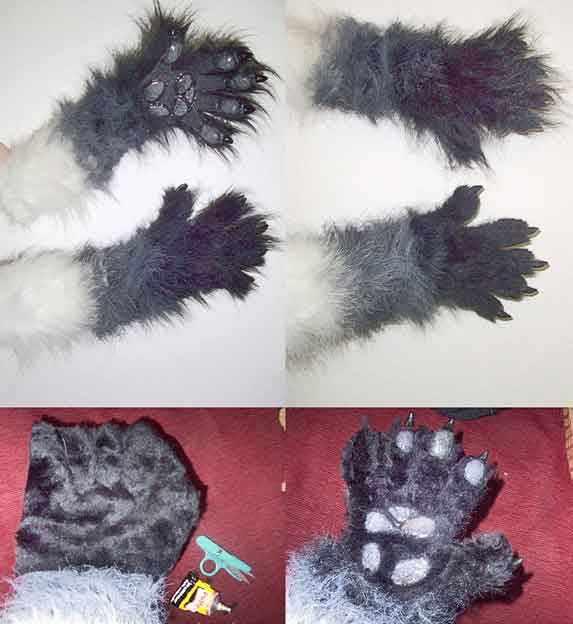
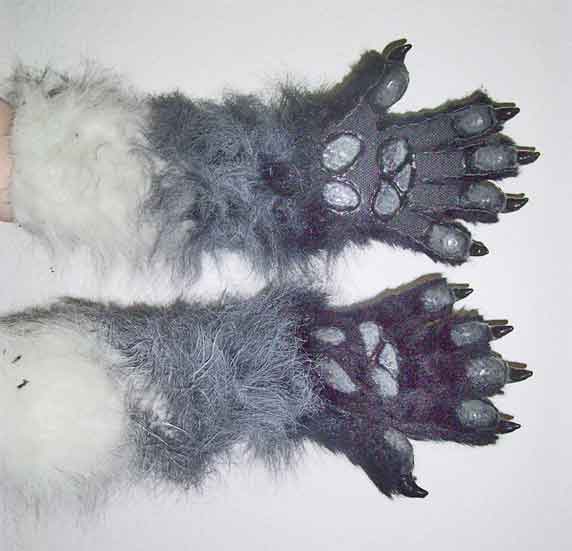
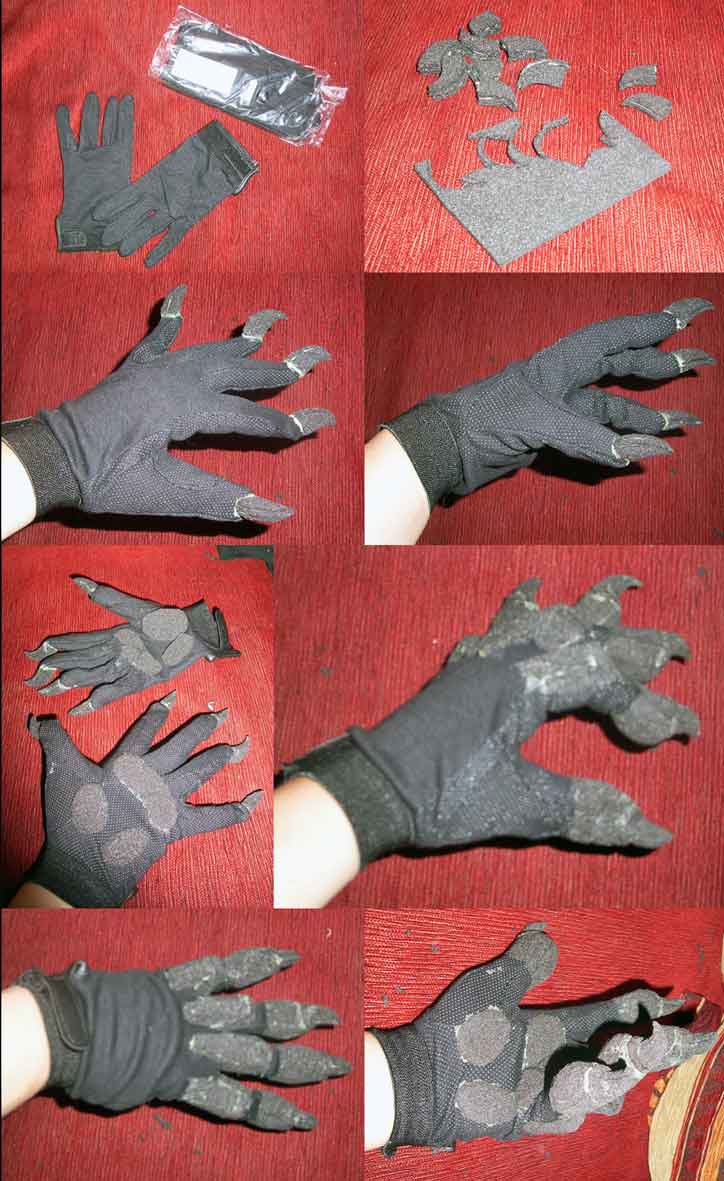
As base material I bought cotton riding- gloves for 2,99 € online.

The claws are made of 3 layers of foam glued with Pattex and carved with nail scissors. They were the first parts that were attached to the gloves.
I placed them approximately above my own nails on the gloves, not to the front but a little upwardly. The effect was astonishing. They not only looked very wolf- like but also didnīt very much hamper dexterity. For the look it was important that they were bend (about 90 degrees).

Next came the balls of the paws. I didnīt want them too thick so as not to impair grabbing. I used one layer of foam that was carved with nail scissors. I first affixed the pad only with a small strip of Pattex, them worked on it until the shape was right, then completely glued it.

YMBrW27

Then the fingertips and knuckles were added working from finger to finger. With the second hand Iīll first do all fingertips, then all knuckles; this seems to be the faster way to do it.
For the tips I principally built a box around my fingertip that on the underside has two layers of foam. Then I glued a thin strip of foam around the claw and carved it with nail scissors. The flexion wave tool proved too fast-turning and uncontrollable for the purpose.

The knuckles were made in a similar way with double layers of foam on top and single layers at the sides. A small piece was added towards the high part to smoothen the blending.

The look that emerged is a positive surprise for me. The fingersī slightly spread position is at first a little unfamiliar but I soon got used to it.

The firmness but also flexibility of the claws is sufficient enough to use them as weapons InTime but they are also suitable for picking up a pencil. The buildup of the fingertips takes away a little of the fine motor skills but I wore the claw yesterday while making cappucino or cereal and look forward to further tests when both claws are finished.

YMBrW28

Left: Claws

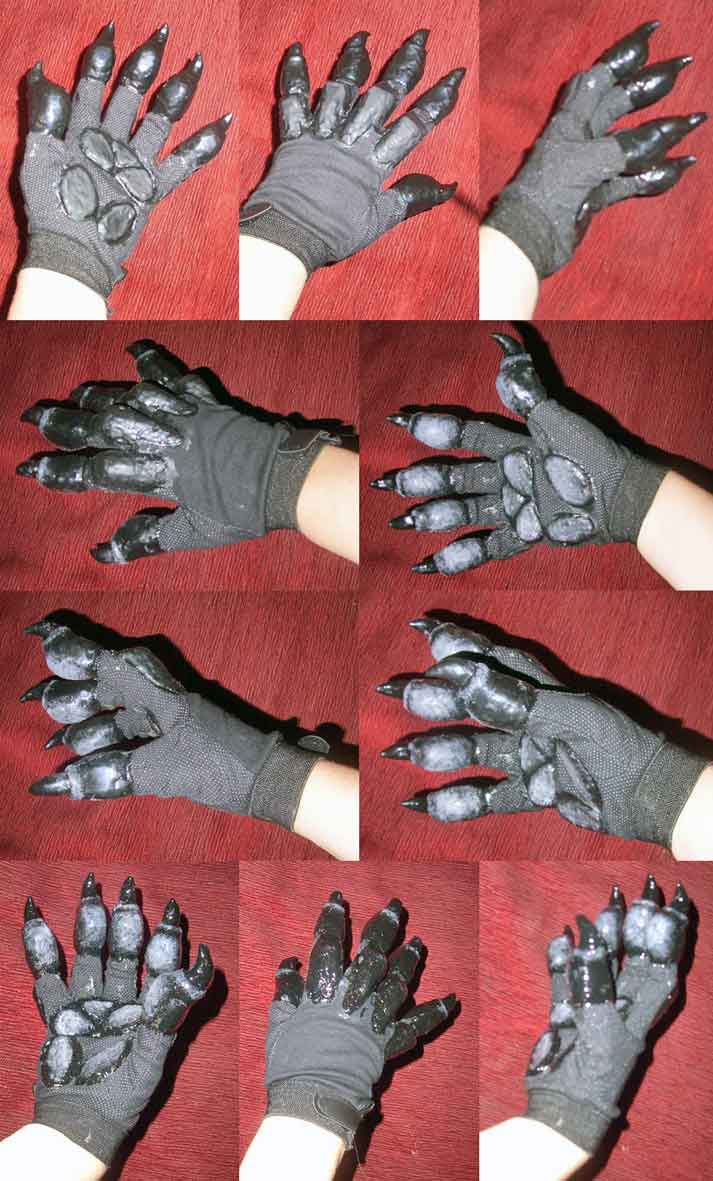
In step number two the claws were latexed. I did this with the claws mounted on a candle stand on the balcony where it doesnīt matter when a few drops go astray. I applied the latex with a cotton stick.

pictures 1 - 3:
The foam was covered with 3 to 4 layers of black latex. I tried to hide junctions of the foam and the cloth. Pay heed not to apply too much latex in order to avoid drops. One I couldnīt prevent but it turned out that they can be cut off with nail scissors and smoothened with a little more latex.

pictures 4 - 7:
Black latex only swallows up contours and looks artificial. So I took a small portion of the black latex, added a little white to the mixture and produced grey.
This I cerafully applied with a small sponge (foam leftover) and dappled it onto the surface with a clean sponge. I only needed a very small amout of white latex for this.

last pictures:
Eventually the clwas received a layer of Isoflex for protection. This makes them more robust and the colourīs contrasts are intensified, even when it makes them appear shiny.

Now I just have to treat them a little with silicone. The next step will be the application of fur.

Left: Claws, fur covering
This is the last part of the claw- documentation for the moment. I have completed the fur and the trimming can only take place after the completion of the upper body.

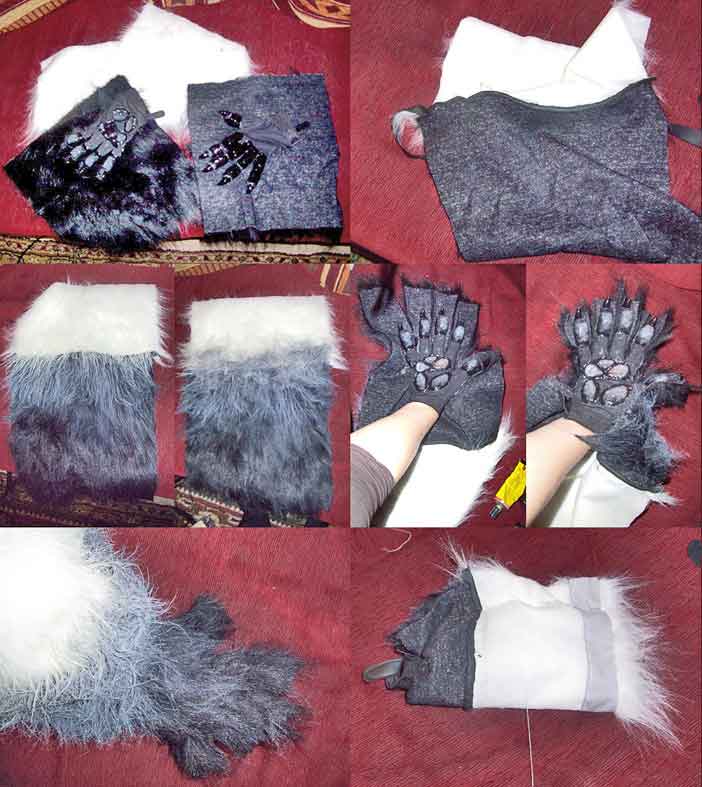
I used three sorts of artificial fur: long white, long black and short black plush.
Other materials were needle and thread, bias binding, a broad rubber strap, some cloth and a lot of Fixogum (a glue made by Marabu).

First I basted the two long pieces of fur. Then I made a painting test. From now on Iīll apply paint after completion but I had to know if colouring the artificial fur would work.

I tested spray paint as well as application of acrylics by brush. Spray is easy and consistent but colours only the tips of the hairs. With a bristle brush one can reach deeper but has to pay attention with the gradient. And of course not to dab blotches.

YMBrW29

Surely one can use a kind of paper pattern for the fur coverings but I accepted waste of material and just glued the fur onto the back of the glove. Looked quite muppet- like...
Then I cut off more and more, all the while glueing further. In a few places I also fixed the fur with some stitches.

I want to wear protectors under the fur so the gauntlets mustnīt be too tight. To prevent slipping out of place they need a rubber inlay at the top.
I pondered the problem of attaching the rubber for a while until Hana had the ides of sewing a tunnel and putting the rubber bands in it. To hinder it from twisting I attached it on one point inside the gauntlet. Thus it is fixed but also changeable and adjustable.

YMBrW30
YMBrW31

To close the gauntlet I first dressed the protectors, then fixed the fur around the arms with pins and marked the seam with a pencil. Then I sewed the fur together inside out and - after testing the fit- cut off the surplus fur.

Many would stop now what I consider a mistake.
Left picture, lower row: Preliminary trimming of the fur.
I used ligature scissors for it- normal ones would have made my fingers falling off but with this tool it all went smoothly.

I shortend the hairs between and on top of the fingers. Later I will probably also shorten the fur on the back of the hand but this can be done only with the upper body completed.

At this point I again thought of stopping, but for the like of the look I decided to proceed and also put fur onto the palm of the hand.
The long fur has the disadvantage that white threads are woven into the carrier cloth which are visible when the fur is cut too short; which I did at the edges.
Also during the test- phase (yes; cappucino- making) i noticed that when grasping things I mostly use the padded areas.

So I took short black plush- fur that is mounted on black cloth this time and glued it onto the palms around the pads.
The plush has made the paws a little stiffer but now they look much more realistic.

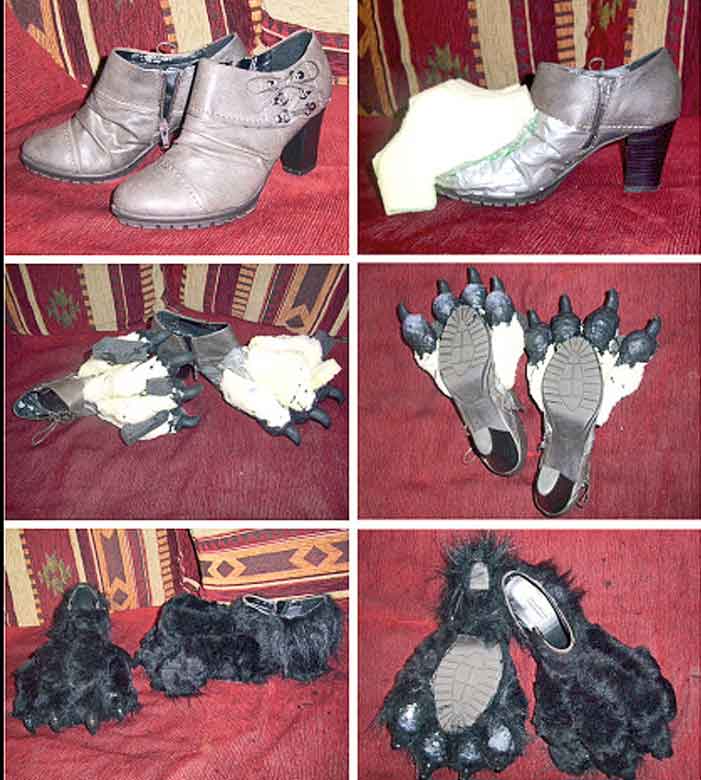
The feet

YMBrW32

Left: Feet
Basics are a pair of shoes from a big german provider (Deichmann). They have about 8-cm- wedge heels. I know about the risks but I myself have worn shoes of this kind very often for larps and never turned an ankle. I also was hiking in norway on high heels. I grant this is not for everybody and Iīm sure the other manwolves will prefer flat soles.
I wanted these because they shorten the foot optically, thus strengthening the digitgrade look.

I built them similar to the claws from carved foam.
Above right you see how I started the shapes.

Then again latex, colours and Isoflex were deployed. After that they were stuck all over with fur that reaches right up to the shoeīs edges.

They impair walking only slightly and running is also possible, but after the Role-Playing-Convention and about 3 hours photoshooting in a forest I had to reattach the toes. The fur nevertheless hold them together so I will probably keep the construction that way and only cohere the toes with a strap of leather.

I am astonishingly satisfied with the feet and also like the way they blend into the suit.

YMBrW35 YMBrW34

Above and below: First test

YMBrW33

Me again:

In the meantime the she-wolf has absolved several performances. For more pictures hereīs a link to one of Ralf Hülsīgalleries. Thereīll be no better pictures like these...
http://kamerakata.de/gallery/v/larp/sonst/mannwolf/ .

YMBrW38
YMBrW37 YMBrW36

Above: Drachenfest 2011

Meanwhile one can meet the wolves in the gameworlds- which doesnīt mean they are finished. As character- players (no NPCs) they and their equipment constantly evolve.

And Brittaīs documentation and description of the working techniques is as comprehensive as one would wish.
Thank you very much!
Alex

[Home] [Deutsch] [English] [about me] [whatīs new] [Contents] [about monsters] [faqs] [other sites]